All Stories
Showing posts with label Windows. Show all posts
I wrote an article that described how to connect from a Ubuntu computer to a Windows Computer using the “real” remote Desktop. Now I will describe how to do the inverse: How to connect from Windows to Ubuntu using Windows remote desktop (the real one as well). As I described in the previous article, Ubuntu’s Remote Desktop is nothing more than VNC, which is very slow and cumbersome compared to the real Microsoft Windows remote desktop.  It can be made to work in a Windows machine if you install VNC, however, that is not the ideal solution specially if you have to work with it often. If you are used to Windows Remote desktop speeds, VNC will just drive you crazy. Fortunately there is a solution. To connect from Ubuntu to Windows we use “rdesktop“, and to connect from Windows to Ubuntu we are going to use “xrdp” which is basically the remote desktop protocol for the xwindows environment.

Instructions
To install “xrdp” click on “Applications” and “Ubuntu Software Center“.
 On the Ubuntu Software Center window, enter “xrdp” in the search field and press the  “enter” key; once it finds it, click on the “install” button.
 When installation finishes on Ubuntu, go to your Windows computer and open the “Remote Desktop Connection“, enter the IP address of the Ubuntu computer and click the “Connect” button.
 Immediately you will see the screen of the remote computer. Enter the username and password for the remote Ubuntu computer and click “OK” to continue.
 And that is all, now you should be able to see and control your remote Ubuntu machine from your Windows computer.


Final Thoughts
Many people in the Linux world do not seem to be aware of the fact that Windows and Ubuntu can communicate using the “real” Windows remote desktop. Not only this is not apparent but, for some reason, Ubuntu decided to rename VNC as “remote desktop viewer”, implying that this is the only way to establish a remote desktop connection.

How to Connect from Windows to Ubuntu using Remote Desktop

I wrote an article that described how to connect from a Ubuntu computer to a Windows Computer using the “real” remote Desktop. Now I will describe how to do the inverse: How to connect from Windows to Ubuntu using Windows remote desktop (the real one as well). As I described in the previous article, Ubuntu’s Remote Desktop is nothing more than VNC, which is very slow and cumbersome compared to the real Microsoft Windows remote desktop.  It can be made to work in a Windows machine if you install VNC, however, that is not the ideal solution specially if you have to work with it often. If you are used to Windows Remote desktop speeds, VNC will just drive you crazy. Fortunately there is a solution. To connect from Ubuntu to Windows we use “rdesktop“, and to connect from Windows to Ubuntu we are going to use “xrdp” which is basically the remote desktop protocol for the xwindows environment.

Instructions
To install “xrdp” click on “Applications” and “Ubuntu Software Center“.
 On the Ubuntu Software Center window, enter “xrdp” in the search field and press the  “enter” key; once it finds it, click on the “install” button.
 When installation finishes on Ubuntu, go to your Windows computer and open the “Remote Desktop Connection“, enter the IP address of the Ubuntu computer and click the “Connect” button.
 Immediately you will see the screen of the remote computer. Enter the username and password for the remote Ubuntu computer and click “OK” to continue.
 And that is all, now you should be able to see and control your remote Ubuntu machine from your Windows computer.


Final Thoughts
Many people in the Linux world do not seem to be aware of the fact that Windows and Ubuntu can communicate using the “real” Windows remote desktop. Not only this is not apparent but, for some reason, Ubuntu decided to rename VNC as “remote desktop viewer”, implying that this is the only way to establish a remote desktop connection.

Posted at 3:37 PM |  by Narut0
To many IT professionals it is imperative to be able to connect remotely to their work via VPN and if you connect by VPN, the next likely step is to connect using Remote Desktop. Many of us however, prefer to use Ubuntu at home and in most workplaces almost all machines are Windows based; that is where the problem comes in. One big obstacle in finding the solution is the apparent lack of a true compatible Windows Remote Desktop alternative in Ubuntu, and the scarcity of information on the web about this topic. This myth becomes even more believable when users find that Ubuntu has labeled VNC as “Remote Desktop Viewer”; a total nonsense. VNC is not compatible with Windows Remote Desktop, but “rdesktop” is and it comes already pre-installed in Ubuntu. I have also written another article that explains how to do the inverse:  Connecting from Windows to Ubuntu using remote desktop .

How to Use Rdesktop
Rdesktop is a command line application. To use it easily and effectively we have to create a custom command line and save it as an executable shortcut on Ubuntu’s desktop.
Right click on the Desktop and click on “Create Document” and “Empty File“.


Right click on your empty test file and rename it whatever you wish.

Then, open your new empty text file and paste the following line inside it:

rdesktop -g 1152x864 -r disk:home=/home/username -r clipboard:CLIPBOARD -r
 sound:off -x l -P 192.168.1.200 -u "administrator@domain.local" -p password


I have highlighted in red the parts of the line that need to be changed.

Command Line Explained by Parts
Changing the Size of the Remote Desktop Screen
To change the size you need to change the resolution; the first part of the line highlighted in red is this resolution, play with it until you get to the desired size. Some of the most common sizes are:
640X480
800X600
1024×768
1152×864

Enter IP of Remote Computer
Change the sample IP “192.168.1.200” to the IP of the remote computer or domain you wish to connect to.
Enter Username of Remote Computer and Domain Name
If you are trying to connect to a Windows Domain, you have to enter your username in that domain and make sure you specify the domain name as part of the username. Take a look at our example. If our username was “Administrator” and our domain name was “domain” then our username will be “administrator@domain.local“. Similarly, if our username was “jdoe” and our domain name was “mycompany” then our username was “jdoe@mycompany.local“. If your computer is not on a domain or it resides inside your same network,  just enter your username.
Enter Password
Just replace the last part of the command line with your password. You can leave this part out if you are concerned about having your network password on a text file that anybody can click. This however, makes it a lot easier, since you will be logged in automatically just by clicking the icon on your desktop, all in one step.
Make Shortcut Executable
To make the shortcut executable, right click on it and select “Properties“, then on the properties windows, click on the “Permissions” tab and check “Allow executing file as a program“.

And finally we will be able to connect to any Windows machine using its native Remote Desktop

How to Use the Real Windows Remote Destop in Ubuntu

To many IT professionals it is imperative to be able to connect remotely to their work via VPN and if you connect by VPN, the next likely step is to connect using Remote Desktop. Many of us however, prefer to use Ubuntu at home and in most workplaces almost all machines are Windows based; that is where the problem comes in. One big obstacle in finding the solution is the apparent lack of a true compatible Windows Remote Desktop alternative in Ubuntu, and the scarcity of information on the web about this topic. This myth becomes even more believable when users find that Ubuntu has labeled VNC as “Remote Desktop Viewer”; a total nonsense. VNC is not compatible with Windows Remote Desktop, but “rdesktop” is and it comes already pre-installed in Ubuntu. I have also written another article that explains how to do the inverse:  Connecting from Windows to Ubuntu using remote desktop .

How to Use Rdesktop
Rdesktop is a command line application. To use it easily and effectively we have to create a custom command line and save it as an executable shortcut on Ubuntu’s desktop.
Right click on the Desktop and click on “Create Document” and “Empty File“.


Right click on your empty test file and rename it whatever you wish.

Then, open your new empty text file and paste the following line inside it:

rdesktop -g 1152x864 -r disk:home=/home/username -r clipboard:CLIPBOARD -r
 sound:off -x l -P 192.168.1.200 -u "administrator@domain.local" -p password


I have highlighted in red the parts of the line that need to be changed.

Command Line Explained by Parts
Changing the Size of the Remote Desktop Screen
To change the size you need to change the resolution; the first part of the line highlighted in red is this resolution, play with it until you get to the desired size. Some of the most common sizes are:
640X480
800X600
1024×768
1152×864

Enter IP of Remote Computer
Change the sample IP “192.168.1.200” to the IP of the remote computer or domain you wish to connect to.
Enter Username of Remote Computer and Domain Name
If you are trying to connect to a Windows Domain, you have to enter your username in that domain and make sure you specify the domain name as part of the username. Take a look at our example. If our username was “Administrator” and our domain name was “domain” then our username will be “administrator@domain.local“. Similarly, if our username was “jdoe” and our domain name was “mycompany” then our username was “jdoe@mycompany.local“. If your computer is not on a domain or it resides inside your same network,  just enter your username.
Enter Password
Just replace the last part of the command line with your password. You can leave this part out if you are concerned about having your network password on a text file that anybody can click. This however, makes it a lot easier, since you will be logged in automatically just by clicking the icon on your desktop, all in one step.
Make Shortcut Executable
To make the shortcut executable, right click on it and select “Properties“, then on the properties windows, click on the “Permissions” tab and check “Allow executing file as a program“.

And finally we will be able to connect to any Windows machine using its native Remote Desktop

Posted at 3:37 PM |  by Narut0
By now you should all know that even the best spyware removal software protects, but seldom removes spyware once it has infected the computer. The main reason for this is that once your computer is infected, the spyware loads itself in memory every time the computer is started. In Windows no program that is actively running in memory can be erased from the hard drive; it has to be stopped first. This is where all antivirus tools fail. Another reason is that the spyware disables most antiviruses and system tools that pose a threat to it, like for example the Windows task manager.
Lately I’ve discovered a technique to remove almost all malware infections. A technique that has been working reliably for me in a surprisingly vast majority of cases and that can be followed step by step and can be replicated for almost all types of adware or spyware. A technique that will work better than any spyware removal tool you can find. This technique works for all versions of Windows XP, Vista and Windows 7. The pictures that you will see in this article are from Windows XP, however, the steps are similar for all other versions of Windows.
How to remove spyware - Method Summary:
- Open Task Manager as soon as you see the desktop.
- Write down the name of the spyware showing up in task manager and kill it.
- Look for spyware on c:\documents and setting\username\local settings\application data and delete it.
- Look for spyware in registry and delete every single entry as it appears.
- Create a new username, log in with new usermane, rename previous username account folder and reboot.
- Log in with your old usernane so that new profile folder can be created.
- Transfer your files from the old account folder to the current.
 
 Step 1: Identify Spyware in memory and kill it

Turn your computer on and as soon as you login and see your Desktop hit Ctrl-Alt-Del and click on Task Manager, you have to do this fast otherwise the virus will take control of the computer and task manager will no longer open. Once Task Manager is open the spyware will not be able to close it. Never close Task Manager or else the spyware you will not let you open it again unless you reboot. As

soon as you see the spyware appear, (usually a fake anti virus shield on the task bar near the clock) check the Task Manager for any suspicious programs. It also helps if you sort items in the Task Manager by memory usage, this way you will see all new applications as they start popping up. How can you tell the application is suspicious? Use common sense. The application popping up in this example has the name “guxprpnshdw.exe”. As you can see, the name is just a bunch of letters that do not make sense. Now that we have identified our suspicious program, the next step is to get paper and pencil, and write the whole name of the suspicious application making sure not to miss any letters. Then, right click on the application and click “end task” to remove spyware from memory. Once you do this, hover the cursor of the mouse over the fake anti virus shield without clicking on it. If the shield disappears, we know we have killed the fake anti virus in memory. If it does not, we need to continue our search. Repeat the operation with another suspicious-looking file in Task Manager until you find the right one. Make sure to always write down the name of the file before clicking “end task”.

Step 2: Remove spyware from hard drive and registry
 Once you have the name of the file, go to “My Computer” and click on Tools -> Folder Options -> select “View hidden Files and Folders. In Vista and Windows 7 go to Control Panel -> Folder Options and select “View hidden files and folders”. Go to “C:\Documents and Settings\” or “C:\Users” in Windows 7 or Vista and look for a folder with your username. If your computer logs in automatically or you are unsure of your username, you can find out in Windows XP by clicking Ctrl-Atl-Del and it will display who you are logged in as. In Windows 7 all you have to do is click on “start” and it will display your username on the top right corner of the menu; I am not sure about Vista. Once you have identified your username go to the following path “C:\Documents and Settings\username\local settings\application data\”, and in Vista and Windows 7

 it should be either on “C:\Users\username\” or “C:\ProgramData\”. Once there, look for a folder with a suspicious name. In this example our folder name is “xyfbofkle”. Again, notice that its name does not make any sense. Go into the folder and you should find a program with the name of our previously discovered spyware, in this case “guxprpnshdw.exe”. If you find the spyware, write down the name of the folder and delete it. Open the registry by clicking start -> run -> type “regedit” and click enter. Look for every instance of the spyware’s filename using the registry’s search utility and delete it. When you get to the end of the registry repeat the operation, this time using the spyware’s folder name. This should remove the spyware on your computer for good. However, there is one extra step we must take to lessen the possibility of future recurrence.

Step 3: Disable your old profile and create new one
 To be on the safe side and prevent malware from ever coming back, we are going to create a new user profile folder and delete your current one. To do this, create a username and make sure to give it administrator rights. Reboot your computer, (don’t just log off or switch users) and log into your newly

created account. Then, go to your “C:\Documents and Settings\” or “C:\Users\” (in Vista and Windows 7) and rename your previous username account folder. I usually rename it with a “.old” at the end. Example, if my original account folder is named “\administrator\”, I rename it to “\administrator.old\” so it is no longer recognized by Windows. Now reboot your computer again and log in with your old usermane. This will create a brand new account folder with your old usermane. Now, transfer everything you want to save from your “.old” account folder to your new one. Don’t transfer absolutely everything because you run into the risk of transferring whats left of the spyware to your new account. I usually transfer the “My Documents”, “Desktop”, “My Favorites” and nothing else. When finished you can delete the “.old” folder and the account folder you created at the beginning.

 And you are done! as easy as that. No more spyware. This will not work 100% of the time because not all spyware behave exactly same, some can’t even be terminated in the task manager; they just won’t close. However it will work in the big majority of cases. and as I said before it will work better than even the best spyware removal program available in the market today. I can say with certainty that 90% (or probably more) of the malware infections you encounter can be removed using this method.

How to Remove Spyware – Remove Almost All Infections

By now you should all know that even the best spyware removal software protects, but seldom removes spyware once it has infected the computer. The main reason for this is that once your computer is infected, the spyware loads itself in memory every time the computer is started. In Windows no program that is actively running in memory can be erased from the hard drive; it has to be stopped first. This is where all antivirus tools fail. Another reason is that the spyware disables most antiviruses and system tools that pose a threat to it, like for example the Windows task manager.
Lately I’ve discovered a technique to remove almost all malware infections. A technique that has been working reliably for me in a surprisingly vast majority of cases and that can be followed step by step and can be replicated for almost all types of adware or spyware. A technique that will work better than any spyware removal tool you can find. This technique works for all versions of Windows XP, Vista and Windows 7. The pictures that you will see in this article are from Windows XP, however, the steps are similar for all other versions of Windows.
How to remove spyware - Method Summary:
- Open Task Manager as soon as you see the desktop.
- Write down the name of the spyware showing up in task manager and kill it.
- Look for spyware on c:\documents and setting\username\local settings\application data and delete it.
- Look for spyware in registry and delete every single entry as it appears.
- Create a new username, log in with new usermane, rename previous username account folder and reboot.
- Log in with your old usernane so that new profile folder can be created.
- Transfer your files from the old account folder to the current.
 
 Step 1: Identify Spyware in memory and kill it

Turn your computer on and as soon as you login and see your Desktop hit Ctrl-Alt-Del and click on Task Manager, you have to do this fast otherwise the virus will take control of the computer and task manager will no longer open. Once Task Manager is open the spyware will not be able to close it. Never close Task Manager or else the spyware you will not let you open it again unless you reboot. As

soon as you see the spyware appear, (usually a fake anti virus shield on the task bar near the clock) check the Task Manager for any suspicious programs. It also helps if you sort items in the Task Manager by memory usage, this way you will see all new applications as they start popping up. How can you tell the application is suspicious? Use common sense. The application popping up in this example has the name “guxprpnshdw.exe”. As you can see, the name is just a bunch of letters that do not make sense. Now that we have identified our suspicious program, the next step is to get paper and pencil, and write the whole name of the suspicious application making sure not to miss any letters. Then, right click on the application and click “end task” to remove spyware from memory. Once you do this, hover the cursor of the mouse over the fake anti virus shield without clicking on it. If the shield disappears, we know we have killed the fake anti virus in memory. If it does not, we need to continue our search. Repeat the operation with another suspicious-looking file in Task Manager until you find the right one. Make sure to always write down the name of the file before clicking “end task”.

Step 2: Remove spyware from hard drive and registry
 Once you have the name of the file, go to “My Computer” and click on Tools -> Folder Options -> select “View hidden Files and Folders. In Vista and Windows 7 go to Control Panel -> Folder Options and select “View hidden files and folders”. Go to “C:\Documents and Settings\” or “C:\Users” in Windows 7 or Vista and look for a folder with your username. If your computer logs in automatically or you are unsure of your username, you can find out in Windows XP by clicking Ctrl-Atl-Del and it will display who you are logged in as. In Windows 7 all you have to do is click on “start” and it will display your username on the top right corner of the menu; I am not sure about Vista. Once you have identified your username go to the following path “C:\Documents and Settings\username\local settings\application data\”, and in Vista and Windows 7

 it should be either on “C:\Users\username\” or “C:\ProgramData\”. Once there, look for a folder with a suspicious name. In this example our folder name is “xyfbofkle”. Again, notice that its name does not make any sense. Go into the folder and you should find a program with the name of our previously discovered spyware, in this case “guxprpnshdw.exe”. If you find the spyware, write down the name of the folder and delete it. Open the registry by clicking start -> run -> type “regedit” and click enter. Look for every instance of the spyware’s filename using the registry’s search utility and delete it. When you get to the end of the registry repeat the operation, this time using the spyware’s folder name. This should remove the spyware on your computer for good. However, there is one extra step we must take to lessen the possibility of future recurrence.

Step 3: Disable your old profile and create new one
 To be on the safe side and prevent malware from ever coming back, we are going to create a new user profile folder and delete your current one. To do this, create a username and make sure to give it administrator rights. Reboot your computer, (don’t just log off or switch users) and log into your newly

created account. Then, go to your “C:\Documents and Settings\” or “C:\Users\” (in Vista and Windows 7) and rename your previous username account folder. I usually rename it with a “.old” at the end. Example, if my original account folder is named “\administrator\”, I rename it to “\administrator.old\” so it is no longer recognized by Windows. Now reboot your computer again and log in with your old usermane. This will create a brand new account folder with your old usermane. Now, transfer everything you want to save from your “.old” account folder to your new one. Don’t transfer absolutely everything because you run into the risk of transferring whats left of the spyware to your new account. I usually transfer the “My Documents”, “Desktop”, “My Favorites” and nothing else. When finished you can delete the “.old” folder and the account folder you created at the beginning.

 And you are done! as easy as that. No more spyware. This will not work 100% of the time because not all spyware behave exactly same, some can’t even be terminated in the task manager; they just won’t close. However it will work in the big majority of cases. and as I said before it will work better than even the best spyware removal program available in the market today. I can say with certainty that 90% (or probably more) of the malware infections you encounter can be removed using this method.

Posted at 3:37 PM |  by Narut0
Hasn’t this happened to all of us?. You discover you have a virus, you go to task manager and you are unable to identify it but you see a bunch of strange looking svchost processes.  SVCHOST.EXE is basically a Windows program that executes dll files. DLL files can’t run by themselves; they need a program to run them. This is where svchost comes in.  Some Windows pocesses come in DLL format rather than EXE. Some of these processes include “Windows Firewall”, “Automatic Updates”, “Plug and Play”, Windows Themes”, “Fax Service”, etc. Sometimes however, viruses use svchost to run; this way they cannot be identified on task manager and appear harmless, disguised as a Windows process.

How to tell if SVCHOST.EXE is harmless or not.
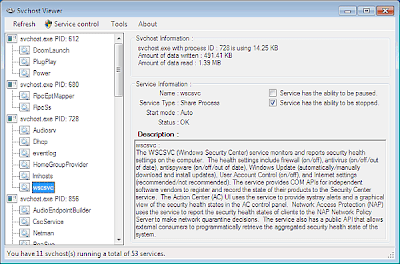
Fortunately for all of us there is a free utility designed just for identifying all svchost processes running on your computer. it is called svchost viewer and it works in XP, Vista and Windows 7. Svchost viewer not only tells you all processes running for each particular instance of svc host but also gives you a description of what these processes are. Take a look at the picture below:

What makes an svchost process suspicious?
Simple…
1) Any svchost process not identified by svchost viewer
2) Any svchost process consuming cpu capacity: If you see a svchost process hogging your cpu, making it run at 50%, 90%, 100% capacity, this might be the sign of a trojan horse trying to send spam or doing other malicious activities.

How to kill a suspicious svchost process
Svchost viewer itself can be a pretty effective svchost.exe killer. All you have to do is:
Select the Service to be killed >> Service Control >> Stop Selected Service.
A word of caution: Ending a particular service won’t probably cause permanent damage to your computer, however, before doing this make sure that no other programs are running, like an open document you have not finished or a defragmentation currently in progress. Some of these processes are critical, and ending one can cause the computer to frezee or to restart.

How to remove an svchost-related virus
If after killing the suspicious process, your virus or spyware goes away, you know you have identified it. Now it’s time to remove it. I have written an article on how to remove practically any virus on your computer, click here to read it.

What is svchost.exe? Is it a Trojan or Virus?

Hasn’t this happened to all of us?. You discover you have a virus, you go to task manager and you are unable to identify it but you see a bunch of strange looking svchost processes.  SVCHOST.EXE is basically a Windows program that executes dll files. DLL files can’t run by themselves; they need a program to run them. This is where svchost comes in.  Some Windows pocesses come in DLL format rather than EXE. Some of these processes include “Windows Firewall”, “Automatic Updates”, “Plug and Play”, Windows Themes”, “Fax Service”, etc. Sometimes however, viruses use svchost to run; this way they cannot be identified on task manager and appear harmless, disguised as a Windows process.

How to tell if SVCHOST.EXE is harmless or not.
Fortunately for all of us there is a free utility designed just for identifying all svchost processes running on your computer. it is called svchost viewer and it works in XP, Vista and Windows 7. Svchost viewer not only tells you all processes running for each particular instance of svc host but also gives you a description of what these processes are. Take a look at the picture below:

What makes an svchost process suspicious?
Simple…
1) Any svchost process not identified by svchost viewer
2) Any svchost process consuming cpu capacity: If you see a svchost process hogging your cpu, making it run at 50%, 90%, 100% capacity, this might be the sign of a trojan horse trying to send spam or doing other malicious activities.

How to kill a suspicious svchost process
Svchost viewer itself can be a pretty effective svchost.exe killer. All you have to do is:
Select the Service to be killed >> Service Control >> Stop Selected Service.
A word of caution: Ending a particular service won’t probably cause permanent damage to your computer, however, before doing this make sure that no other programs are running, like an open document you have not finished or a defragmentation currently in progress. Some of these processes are critical, and ending one can cause the computer to frezee or to restart.

How to remove an svchost-related virus
If after killing the suspicious process, your virus or spyware goes away, you know you have identified it. Now it’s time to remove it. I have written an article on how to remove practically any virus on your computer, click here to read it.

Posted at 3:36 PM |  by Narut0
Continuing with our “converting to PDF” series, we are now going to take a look at Office 2010. With Office 2010 it is as easy as ever to convert your Word,  Excel, or Powerpoint files to PDF format. Microsoft has finally decided to include this option by default in the Office 2010 suite. In this short tutorial we will be covering how to save Word, Excel, Powerpoint and other Office program files to PDF in a few, very simple steps. In addition to PDF format, now you can save the in XPS format as well.  If you wish to save in formats other than PDF and XPF, read the last section of this article.

Converting from Word, Excel and Powerpoint to PDF
1) To save your file to PDF, click on the “File” tab.
2) Then click on “Share” or “Save and Send” (you can also click “Save As” and then select “PDF” format as the “File Type“, however, the aforementioned options will give you more control).
3) In the middle section, click on “Create PDF/XPS Document“.
4) In the last section to the right, click on “Create a PDF/XPS Document“.


Next, the “Publish as PDF or XPS” window will appear. At the bottom of the window you will have two options: Standard (Publishing Online and Printing) and Minimum Size (Publishing Online). These options relate to the file size; choose the one that works best for you. Bear in mind that if you choose “Minimum Size” the quality of the document will suffer.
Once you are done choosing the file size, click on “Save as type:“; select PDF and click on the “Publish” button.
Note: If you wish to save in XPS format all you have to do is change the “File Type” at the end, and then publish (or save) your file.

Converting From Any Program to PDF (Optional)
It is rather convenient to have the possibility to convert your documents to PDF straight from Word or any of the programs included in the Office suite. This option, however, is limited to the Office package and only converts files to PDF or XPS format. If you want to be able to convert to PDF from any program and in additional image formats, like BMP, PNG, JPEG, SVG, etc. read my article:

Convert Any Document to PDF for Free

Convert Office 2010 Documents to PDF


Continuing with our “converting to PDF” series, we are now going to take a look at Office 2010. With Office 2010 it is as easy as ever to convert your Word,  Excel, or Powerpoint files to PDF format. Microsoft has finally decided to include this option by default in the Office 2010 suite. In this short tutorial we will be covering how to save Word, Excel, Powerpoint and other Office program files to PDF in a few, very simple steps. In addition to PDF format, now you can save the in XPS format as well.  If you wish to save in formats other than PDF and XPF, read the last section of this article.

Converting from Word, Excel and Powerpoint to PDF
1) To save your file to PDF, click on the “File” tab.
2) Then click on “Share” or “Save and Send” (you can also click “Save As” and then select “PDF” format as the “File Type“, however, the aforementioned options will give you more control).
3) In the middle section, click on “Create PDF/XPS Document“.
4) In the last section to the right, click on “Create a PDF/XPS Document“.


Next, the “Publish as PDF or XPS” window will appear. At the bottom of the window you will have two options: Standard (Publishing Online and Printing) and Minimum Size (Publishing Online). These options relate to the file size; choose the one that works best for you. Bear in mind that if you choose “Minimum Size” the quality of the document will suffer.
Once you are done choosing the file size, click on “Save as type:“; select PDF and click on the “Publish” button.
Note: If you wish to save in XPS format all you have to do is change the “File Type” at the end, and then publish (or save) your file.

Converting From Any Program to PDF (Optional)
It is rather convenient to have the possibility to convert your documents to PDF straight from Word or any of the programs included in the Office suite. This option, however, is limited to the Office package and only converts files to PDF or XPS format. If you want to be able to convert to PDF from any program and in additional image formats, like BMP, PNG, JPEG, SVG, etc. read my article:

Convert Any Document to PDF for Free

Posted at 10:27 AM |  by Narut0

Unlike the new Office 2010 Suite, Office 2007 does not have the capability to convert and save its documents into PDF files natively. There is, however, the possibility of installing a plug-in provided by Microsoft for this purpose. For some reason, Microsoft did not include it with the 2007 Office package by default, however, it is available on the web as a free download. Sadly, Microsoft waited until the 2007 version to provide a plug-in and till the 2010 version to make it a permanent addition the their Office suite, even though third party software had been offering this capability many years before. Nonetheless, this is a much welcomed option, specially for those of us for whom saving in PDF format is imperative.
Converting from Word, Excel and Powerpoint to PDF
Download and install the PDF plug-in for Office 2007 made by Microsoft.


There is nothing in particular worth mentioning about the installation, just keep clicking next until you finish.
Once installed, open the Office document you wish to save and click on the Orb.
Click on “Save As“.
Now you have a new option for saving in PDF format. Click on “PDF“.


Navigate to the desired location where you wish to save your new PDF file and click on “Save“.
And that is all; you have converted your Office document to PDF without spending a dime.
Converting From Any Program to PDF (Optional)
It is rather convenient to have the possibility to convert your documents to PDF straight from Word, Excel, Powerpoint, etc. This option, however, is limited to the Office package and only converts files to PDF format. If you wish to be able to convert to PDF from any program and in many other formats, like BMP, PNG, JPED, SVG, etc. read my article:

Convert Any Document to PDF for Free

This option is specially useful for Office 2003 and older versions of Office.

Convert Office 2007 Documents to PDF


Unlike the new Office 2010 Suite, Office 2007 does not have the capability to convert and save its documents into PDF files natively. There is, however, the possibility of installing a plug-in provided by Microsoft for this purpose. For some reason, Microsoft did not include it with the 2007 Office package by default, however, it is available on the web as a free download. Sadly, Microsoft waited until the 2007 version to provide a plug-in and till the 2010 version to make it a permanent addition the their Office suite, even though third party software had been offering this capability many years before. Nonetheless, this is a much welcomed option, specially for those of us for whom saving in PDF format is imperative.
Converting from Word, Excel and Powerpoint to PDF
Download and install the PDF plug-in for Office 2007 made by Microsoft.


There is nothing in particular worth mentioning about the installation, just keep clicking next until you finish.
Once installed, open the Office document you wish to save and click on the Orb.
Click on “Save As“.
Now you have a new option for saving in PDF format. Click on “PDF“.


Navigate to the desired location where you wish to save your new PDF file and click on “Save“.
And that is all; you have converted your Office document to PDF without spending a dime.
Converting From Any Program to PDF (Optional)
It is rather convenient to have the possibility to convert your documents to PDF straight from Word, Excel, Powerpoint, etc. This option, however, is limited to the Office package and only converts files to PDF format. If you wish to be able to convert to PDF from any program and in many other formats, like BMP, PNG, JPED, SVG, etc. read my article:

Convert Any Document to PDF for Free

This option is specially useful for Office 2003 and older versions of Office.

Posted at 9:58 AM |  by Narut0

Remember the days where the only way to convert a Word or Excel document to PDF was to purchase a $600 license of Adobe Acrobat? Things have changed a lot since then. Now, there is a variety of free programs you can choose from to convert your files. Prices of these programs vary greatly; they can be anywhere from free to quite costly. As some of us might already know, commercial products are not always the best; in fact free, open source utilities match and many times surpass commercial software capabilities. In this article we will take a look at a free, open source utility called PDFCreator.
This option actually works for all versions of Office as well as any program on your computer with print capabilities. Is is specially useful for those of us who are still using older versions of Microsoft Office (like 2003 and below), which do not have the option to save in PDF format by default. In order for you to create a PDF in these older versions of Office you are going to have to install third party software that will allow you to “print to PDF”. Don’t worry, you won’t actually have to print anything, but rather use the print option to save your file as a PDF document.
After quite a bit of research, we picked PDFCreator; a free and open source utility that does much more than just save your file in PDF format. PDFCreator lets you alter the metadata inside the resulting pdf file, allowing you to include things such as keywords, author’s name, etc. It also lets you save your files to many additional formats like PNG, JPEG, BMP, TIFF, PSD, SVG, among others.

Instructions
Download PDFCreator and install it on your computer; there is nothing worth mentioning about the installation, just keep clicking next until you finish.
Once installed, open the document you wish to convert; click on “File” and “Print“.
Make sure the printer is set to “PDFCreator“.

 Next, depending on your program, click on the “Print” or “Ok” buttons. After a few seconds, a second window will pop up. In this window, you can enter all the metadata you wish to be included on your PDF document; this is totally optional. When finished editing the metadata, click “Save” to convert and save your document in PDF format.


Saving to Other Formats (Optional)
On the same previous window there is an “Options” button; click on it if you wish to save your document in a format other than PDF.


Then, once PDFCreator’s option window open up, on the left-hand side column, click on “Save“.
On the right-hand section under “Standard Save Format“, click on the drop down menu and select the file format you wish PDFCreator to save files by default.
Click “Save” to finish.


From now on, PDFCreator will save your files in the format you selected. If you wish to go back to PDF format, just repeat the same steps.

Final Thoughts
Converting a document using PDF creator, involves one extra step over native PDF conversion options. Office 2007 offers a free plug-in for this purpose, and Office 2010 has the option by default.  PDFCreator, however, works with every program on your computer that has print capabilities and can save in a variety of file formats; formats not available with these other simpler options.

Convert Any Document to PDF for Free


Remember the days where the only way to convert a Word or Excel document to PDF was to purchase a $600 license of Adobe Acrobat? Things have changed a lot since then. Now, there is a variety of free programs you can choose from to convert your files. Prices of these programs vary greatly; they can be anywhere from free to quite costly. As some of us might already know, commercial products are not always the best; in fact free, open source utilities match and many times surpass commercial software capabilities. In this article we will take a look at a free, open source utility called PDFCreator.
This option actually works for all versions of Office as well as any program on your computer with print capabilities. Is is specially useful for those of us who are still using older versions of Microsoft Office (like 2003 and below), which do not have the option to save in PDF format by default. In order for you to create a PDF in these older versions of Office you are going to have to install third party software that will allow you to “print to PDF”. Don’t worry, you won’t actually have to print anything, but rather use the print option to save your file as a PDF document.
After quite a bit of research, we picked PDFCreator; a free and open source utility that does much more than just save your file in PDF format. PDFCreator lets you alter the metadata inside the resulting pdf file, allowing you to include things such as keywords, author’s name, etc. It also lets you save your files to many additional formats like PNG, JPEG, BMP, TIFF, PSD, SVG, among others.

Instructions
Download PDFCreator and install it on your computer; there is nothing worth mentioning about the installation, just keep clicking next until you finish.
Once installed, open the document you wish to convert; click on “File” and “Print“.
Make sure the printer is set to “PDFCreator“.

 Next, depending on your program, click on the “Print” or “Ok” buttons. After a few seconds, a second window will pop up. In this window, you can enter all the metadata you wish to be included on your PDF document; this is totally optional. When finished editing the metadata, click “Save” to convert and save your document in PDF format.


Saving to Other Formats (Optional)
On the same previous window there is an “Options” button; click on it if you wish to save your document in a format other than PDF.


Then, once PDFCreator’s option window open up, on the left-hand side column, click on “Save“.
On the right-hand section under “Standard Save Format“, click on the drop down menu and select the file format you wish PDFCreator to save files by default.
Click “Save” to finish.


From now on, PDFCreator will save your files in the format you selected. If you wish to go back to PDF format, just repeat the same steps.

Final Thoughts
Converting a document using PDF creator, involves one extra step over native PDF conversion options. Office 2007 offers a free plug-in for this purpose, and Office 2010 has the option by default.  PDFCreator, however, works with every program on your computer that has print capabilities and can save in a variety of file formats; formats not available with these other simpler options.

Posted at 9:57 AM |  by Narut0
Ubuntu and other Linux distributions have proven to be really useful when Windows stops working. Versatility, portability and speed are among the many advantages of having a bootable OS in a USB flash drive. These installations can help fix problems in Windows operating systems, such as viruses, errors in the registry, etc. They can also act as an “emergency operating system”  when Windows fails, providing an alternate OS you can boot from to extract your files from the affected computer.  Booting from USB flash drives does have one drawback: older computers won’t have this capability. Fortunately, it is becoming less common to find computers that do not support booting from USB. In this tutorial I show you how to create a bootable Ubuntu USB flash drive from Windows. To accomplish this, we are going to be using a utility called Unetbootin.
Instructions
Download the latest Ubuntu distribution (Unetbootin even supports the daily Ubuntu builds)
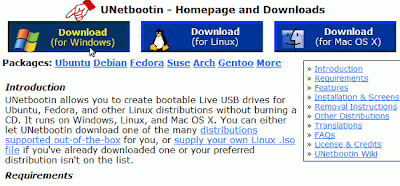
Download Unetbootin; the program does not have an installation as it does not need one; just double click on it and it will start.


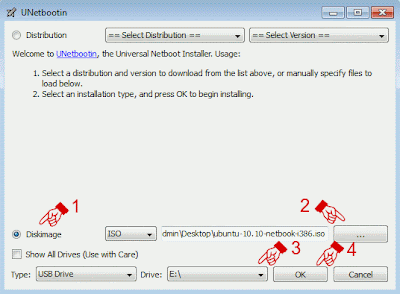
On top of the Unetbootin windows you will see two drop down menus; ignore them if you have already downloaded the ISO. If you do not have the ISO, just select the distribution and the version and Unetbootin will download, and install it for you. The reason I did not focus on this part for the tutorial, is because many of you probably have the ISO downloaded already.
1) Select “Diskimage“.
2) Click the “browse” button and select your ISO image.
3) Make sure your USB destination drive is set to the correct drive letter.
4) Click “OK” to start the process.
 Next, Unetbootin will start creating your flash drive. The Ubuntu image is about 700mb, so the process can take a while.
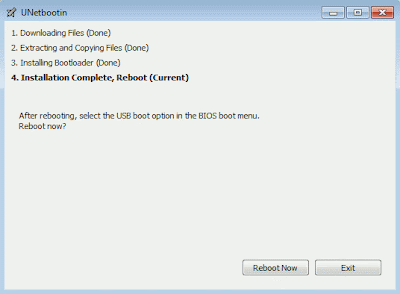
 When Unetbootin finishes creating your Ubuntu bootable USB flash drive, it will give you the choice to either “Reboot” or “Exit” the program. Choose reboot if you wish to try your newly created Ubuntu USB flash drive, otherwise choose “Exit”.

Creating a Bootable Ubuntu USB Flash Drive From Windows

Ubuntu and other Linux distributions have proven to be really useful when Windows stops working. Versatility, portability and speed are among the many advantages of having a bootable OS in a USB flash drive. These installations can help fix problems in Windows operating systems, such as viruses, errors in the registry, etc. They can also act as an “emergency operating system”  when Windows fails, providing an alternate OS you can boot from to extract your files from the affected computer.  Booting from USB flash drives does have one drawback: older computers won’t have this capability. Fortunately, it is becoming less common to find computers that do not support booting from USB. In this tutorial I show you how to create a bootable Ubuntu USB flash drive from Windows. To accomplish this, we are going to be using a utility called Unetbootin.
Instructions
Download the latest Ubuntu distribution (Unetbootin even supports the daily Ubuntu builds)
Download Unetbootin; the program does not have an installation as it does not need one; just double click on it and it will start.


On top of the Unetbootin windows you will see two drop down menus; ignore them if you have already downloaded the ISO. If you do not have the ISO, just select the distribution and the version and Unetbootin will download, and install it for you. The reason I did not focus on this part for the tutorial, is because many of you probably have the ISO downloaded already.
1) Select “Diskimage“.
2) Click the “browse” button and select your ISO image.
3) Make sure your USB destination drive is set to the correct drive letter.
4) Click “OK” to start the process.
 Next, Unetbootin will start creating your flash drive. The Ubuntu image is about 700mb, so the process can take a while.
 When Unetbootin finishes creating your Ubuntu bootable USB flash drive, it will give you the choice to either “Reboot” or “Exit” the program. Choose reboot if you wish to try your newly created Ubuntu USB flash drive, otherwise choose “Exit”.

Posted at 2:34 AM |  by Narut0
Do you suspect your neighbour using your WiFi network without your consent? Rather than spending hours staring at your router’s administration console to find out who is using your WiFi, you can use Wireless Network Watcher – a free utility that scans for devices currently connected to your network.

Once launched, the utility scans the network you are connected to and display the devices currently using your WiFi connection along with their corresponding IP address, Mac Address, Computer names and Network Adapter name.

That’s cool! But what if your neighbour is not connected at the moment you are running the scan? You will obviously not see his or her computer in the list. If you want to get notified as soon as someone attempts to connect to your WiFi network, you will need to tweak the app a bit.
Go to Options and select the following: Put Icon On Tray,Start As Hidden, Tray Balloon on New Device, Background Scan and Beep on New Device.
 We will now set the interval between two scans. To do this click on Options > Advanced options or press F9. In the new window, enter the desired time in seconds between scans, for example 900 (equivalent to 15 minutes).
 Now each time someone connects to your WiFi Network, a balloon notification will appear in your tray icon.

Someone is using my WiFi! Now what?

Ok calm down – don’t tear your hair out if you found someone is using your WiFi. I’ll show you how you can keep freeloaders away from using your WiFi connection.
If someone has been able to connect to your WiFi network, it is most likely because there was no password protection. The simplest solution is set up a strong password using a secure algorithm such as WPA/ WPA2 – avoid using WEP as it is easily crackable.
Don’t worry, you don’t need to know about how encryption algorithm such as WEP/WPA works. You just need to select it on your router’s administration console and set a password.
So how do you do all that? Well, it depends on the type of router you have. Most routers admin console are accessible via the address http://192.168.1.1. You will be prompted for a username and a password. Most router manufacturers set the default credentials to root or admin for both the username and the password. Once you have logged in, look for your Wireless settings and make the appropriate changes.
 Congratulation! You can now start breathing again. This should be enough to keep unauthorized users from using your WiFi. If you are still being paranoid, you can harden your WiFi security by white-listing your computer’s mac address in your router’s console. However, this makes it a bit tougher for welcome guests such as your family or friends, to get online at your house.

Find out who is using your WiFi

Do you suspect your neighbour using your WiFi network without your consent? Rather than spending hours staring at your router’s administration console to find out who is using your WiFi, you can use Wireless Network Watcher – a free utility that scans for devices currently connected to your network.

Once launched, the utility scans the network you are connected to and display the devices currently using your WiFi connection along with their corresponding IP address, Mac Address, Computer names and Network Adapter name.

That’s cool! But what if your neighbour is not connected at the moment you are running the scan? You will obviously not see his or her computer in the list. If you want to get notified as soon as someone attempts to connect to your WiFi network, you will need to tweak the app a bit.
Go to Options and select the following: Put Icon On Tray,Start As Hidden, Tray Balloon on New Device, Background Scan and Beep on New Device.
 We will now set the interval between two scans. To do this click on Options > Advanced options or press F9. In the new window, enter the desired time in seconds between scans, for example 900 (equivalent to 15 minutes).
 Now each time someone connects to your WiFi Network, a balloon notification will appear in your tray icon.

Someone is using my WiFi! Now what?

Ok calm down – don’t tear your hair out if you found someone is using your WiFi. I’ll show you how you can keep freeloaders away from using your WiFi connection.
If someone has been able to connect to your WiFi network, it is most likely because there was no password protection. The simplest solution is set up a strong password using a secure algorithm such as WPA/ WPA2 – avoid using WEP as it is easily crackable.
Don’t worry, you don’t need to know about how encryption algorithm such as WEP/WPA works. You just need to select it on your router’s administration console and set a password.
So how do you do all that? Well, it depends on the type of router you have. Most routers admin console are accessible via the address http://192.168.1.1. You will be prompted for a username and a password. Most router manufacturers set the default credentials to root or admin for both the username and the password. Once you have logged in, look for your Wireless settings and make the appropriate changes.
 Congratulation! You can now start breathing again. This should be enough to keep unauthorized users from using your WiFi. If you are still being paranoid, you can harden your WiFi security by white-listing your computer’s mac address in your router’s console. However, this makes it a bit tougher for welcome guests such as your family or friends, to get online at your house.

Posted at 12:41 PM |  by Narut0
-->
You might be looking for a way to try out Ubuntu Linux but don’t like the idea of creating a partition, using a slow live CD, or don’t have enough resources to run a virtual machine. Today we take a look at using the Wubi installer to get Ubuntu running on your computer with very little effort.
Wubi is an officially supported Ubuntu installer that allows Windows users to easily get started in the Linux realm. Using Wubi to install Ubuntu is a similar process you’d use to install any other software program in Windows. It saves you the hassle of creating another partition or creating a VM. Wubi has been around for a few years now, and official version have been included on the Ubuntu Live CD since 8.04 “Hardy Heron”. We’ll take a look at installing Wubi from the Ubuntu Live CD and also downloading Wubi.exe separately and installing Ubuntu.  
Installing Ubuntu with Wubi from Ubuntu CD
In this first method we’ve already downloaded the Ubuntu Live ISO and burned it to CD. In Windows pop in the Ubuntu 9.10 installation disc and run wubi.exe.

Download Wubi Installer
Download Ubuntu 9.10


At the Ubuntu Menu screen click the Install inside Windows button.
At the Ubuntu Installer screen you choose the language, install drive, installation size, username and password then when you’re finished click Install.

Give it a few moments while the installation kicks off…


When it’s complete, a restart is required but you can do it right away or wait until later.

Installing Ubuntu from Wubi.exe
If you don’t already have the Ubuntu CD, another option is to download the Wubi Installer and kick off the install process. This simplifies the process even more because you don’t need to download the ISO and burn it to disc. One thing to point out with this method is you’ll get extra choices for the type of Desktop Environment you wish to install. In this example we’re choosing the Kubuntu environment.

Now when the installation takes place, it will download the appropriate ISO for the chosen desktop environment. Kubuntu uses the KDE environment which is different from the Gnome used in Ubuntu. The main difference is that KDE is more flashy with graphics and might be easier for a Windows user to get comfortable with.

No matter which route you take to install Ubuntu with Wubi, everything is installed to C:\Ubuntu directory.

Booting Into Ubuntu
After the first reboot, you can choose between Windows 7 or Ubuntu at the Windows Boot Manager screen.
 The first time you boot into Ubuntu, wait a few minutes while the installation finishes up. You’ll see a series of screens and then the main install screen is displayed showing progress and screens showing features offered in Ubuntu 10.12
 Your system will reboot one more time and again you will have Windows 7 or Ubuntu to choose from.
 When you select Ubuntu from the bootloader, it will go into the GRUB bootloader where you can select Ubuntu, Recovery Mode, or back to the Windows 7 Boot Manager.
 At the Ubuntu login screen you’ll notice the username and password will be what you gave it in the steps above.
 That’s really all there is to it…now you can easily boot into Ubuntu and get your geek on with this popular flavor of Linux.

Here is a look at the Kubuntu interface after a bit of tweaking…if you choose that route.

 After Ubuntu has been completely installed, you can select the default boot system by going into Advance System Settings \ Startup and Recovery…then selecting between Windows or Ubuntu.

Uninstall Ubuntu
So you’ve tried Ubuntu and decided you don’t like it, so now what do you do? It’s easy…just uninstall it. Boot into Windows 7 and go into Add / Remove Programs…

Or use a utility like Revo Uninstaller.
 The uninstall process is extremely simple as well and consists of two screens. Verify you want to uninstall Ubuntu…
 That’s it! It’s uninstalled and you have your hard drive space back. When you reboot your system, there’s no leftover funky GRUB or other bootloader to worry about. Your PC will boot directly into Windows.

Conclusion
This might be the easiest way for the Linux beginner to get their feet wet with Ubuntu as there are no partitions to create and installation is extremely simple. For this article we used Windows 7 but it should work on Windows 98 through Windows 7 …except for Windows ME…which no one should be running anyway. If you’re looking for an extremely easy way to start using Ubuntu Linux, you’ll definitely want to give the Wubi install a try.

Download Wubi Installer
Download Ubuntu 9.10

in this articles we see :
installing ubuntu on a windows machine
how do i install wubi
how do i start wubi

installing ubuntu on a windows machine

-->
You might be looking for a way to try out Ubuntu Linux but don’t like the idea of creating a partition, using a slow live CD, or don’t have enough resources to run a virtual machine. Today we take a look at using the Wubi installer to get Ubuntu running on your computer with very little effort.
Wubi is an officially supported Ubuntu installer that allows Windows users to easily get started in the Linux realm. Using Wubi to install Ubuntu is a similar process you’d use to install any other software program in Windows. It saves you the hassle of creating another partition or creating a VM. Wubi has been around for a few years now, and official version have been included on the Ubuntu Live CD since 8.04 “Hardy Heron”. We’ll take a look at installing Wubi from the Ubuntu Live CD and also downloading Wubi.exe separately and installing Ubuntu.  
Installing Ubuntu with Wubi from Ubuntu CD
In this first method we’ve already downloaded the Ubuntu Live ISO and burned it to CD. In Windows pop in the Ubuntu 9.10 installation disc and run wubi.exe.

Download Wubi Installer
Download Ubuntu 9.10


At the Ubuntu Menu screen click the Install inside Windows button.
At the Ubuntu Installer screen you choose the language, install drive, installation size, username and password then when you’re finished click Install.

Give it a few moments while the installation kicks off…


When it’s complete, a restart is required but you can do it right away or wait until later.

Installing Ubuntu from Wubi.exe
If you don’t already have the Ubuntu CD, another option is to download the Wubi Installer and kick off the install process. This simplifies the process even more because you don’t need to download the ISO and burn it to disc. One thing to point out with this method is you’ll get extra choices for the type of Desktop Environment you wish to install. In this example we’re choosing the Kubuntu environment.

Now when the installation takes place, it will download the appropriate ISO for the chosen desktop environment. Kubuntu uses the KDE environment which is different from the Gnome used in Ubuntu. The main difference is that KDE is more flashy with graphics and might be easier for a Windows user to get comfortable with.

No matter which route you take to install Ubuntu with Wubi, everything is installed to C:\Ubuntu directory.

Booting Into Ubuntu
After the first reboot, you can choose between Windows 7 or Ubuntu at the Windows Boot Manager screen.
 The first time you boot into Ubuntu, wait a few minutes while the installation finishes up. You’ll see a series of screens and then the main install screen is displayed showing progress and screens showing features offered in Ubuntu 10.12
 Your system will reboot one more time and again you will have Windows 7 or Ubuntu to choose from.
 When you select Ubuntu from the bootloader, it will go into the GRUB bootloader where you can select Ubuntu, Recovery Mode, or back to the Windows 7 Boot Manager.
 At the Ubuntu login screen you’ll notice the username and password will be what you gave it in the steps above.
 That’s really all there is to it…now you can easily boot into Ubuntu and get your geek on with this popular flavor of Linux.

Here is a look at the Kubuntu interface after a bit of tweaking…if you choose that route.

 After Ubuntu has been completely installed, you can select the default boot system by going into Advance System Settings \ Startup and Recovery…then selecting between Windows or Ubuntu.

Uninstall Ubuntu
So you’ve tried Ubuntu and decided you don’t like it, so now what do you do? It’s easy…just uninstall it. Boot into Windows 7 and go into Add / Remove Programs…

Or use a utility like Revo Uninstaller.
 The uninstall process is extremely simple as well and consists of two screens. Verify you want to uninstall Ubuntu…
 That’s it! It’s uninstalled and you have your hard drive space back. When you reboot your system, there’s no leftover funky GRUB or other bootloader to worry about. Your PC will boot directly into Windows.

Conclusion
This might be the easiest way for the Linux beginner to get their feet wet with Ubuntu as there are no partitions to create and installation is extremely simple. For this article we used Windows 7 but it should work on Windows 98 through Windows 7 …except for Windows ME…which no one should be running anyway. If you’re looking for an extremely easy way to start using Ubuntu Linux, you’ll definitely want to give the Wubi install a try.

Download Wubi Installer
Download Ubuntu 9.10

in this articles we see :
installing ubuntu on a windows machine
how do i install wubi
how do i start wubi

Posted at 1:22 PM |  by Narut0
© 2013 FreshGeek. WP Theme-junkie converted by BloggerTheme9
Blogger templates. Proudly Powered by Blogger.
back to top