Hasn’t this happened to all of us?. You discover you have a virus,
you go to task manager and you are unable to identify it but you see a
bunch of strange looking svchost processes. SVCHOST.EXE is basically a Windows program that executes dll files.
DLL files can’t run by themselves; they need a program to run them.
This is where svchost comes in. Some Windows pocesses come in DLL
format rather than EXE. Some of these processes include “Windows
Firewall”, “Automatic Updates”, “Plug and Play”, Windows Themes”, “Fax
Service”, etc. Sometimes however, viruses use svchost to run;
this way they cannot be identified on task manager and appear
harmless, disguised as a Windows process.
How to tell if SVCHOST.EXE is harmless or not.
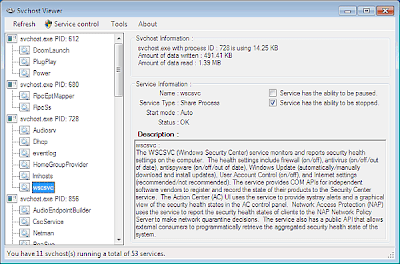
Fortunately for all of us there is a free utility designed just for identifying all svchost processes running on your computer. it is called svchost viewer and it works in XP, Vista and Windows 7. Svchost viewer not only tells you all processes running for each particular instance of svc host but also gives you a description of what these processes are. Take a look at the picture below:
How to tell if SVCHOST.EXE is harmless or not.
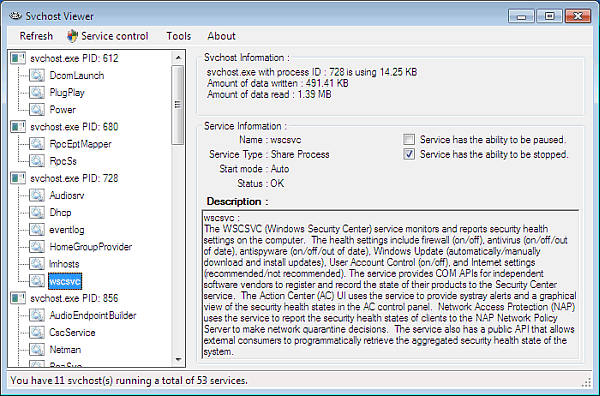
Fortunately for all of us there is a free utility designed just for identifying all svchost processes running on your computer. it is called svchost viewer and it works in XP, Vista and Windows 7. Svchost viewer not only tells you all processes running for each particular instance of svc host but also gives you a description of what these processes are. Take a look at the picture below:
What makes an svchost process suspicious?
Simple…
1) Any svchost process not identified by svchost viewer
2) Any svchost process consuming cpu
capacity: If you see a svchost process hogging your cpu, making it run
at 50%, 90%, 100% capacity, this might be the sign of a trojan horse
trying to send spam or doing other malicious activities.
How to kill a suspicious svchost process
Svchost viewer itself can be a pretty effective svchost.exe killer. All you have to do is:
Select the Service to be killed >> Service Control >> Stop Selected Service.
A word of caution: Ending a particular
service won’t probably cause permanent damage to your computer, however,
before doing this make sure that no other programs are running, like an
open document you have not finished or a defragmentation currently in
progress. Some of these processes are critical, and ending one can cause
the computer to frezee or to restart.
How to remove an svchost-related virus
If after killing the suspicious process,
your virus or spyware goes away, you know you have identified it. Now
it’s time to remove it. I have written an article on how to remove
practically any virus on your computer, click here to read it.
No comments
Posted at 3:36 PM | by
Narut0


