All Stories
Showing posts with label Linux. Show all posts
I wrote an article that described how to connect from a Ubuntu computer to a Windows Computer using the “real” remote Desktop. Now I will describe how to do the inverse: How to connect from Windows to Ubuntu using Windows remote desktop (the real one as well). As I described in the previous article, Ubuntu’s Remote Desktop is nothing more than VNC, which is very slow and cumbersome compared to the real Microsoft Windows remote desktop.  It can be made to work in a Windows machine if you install VNC, however, that is not the ideal solution specially if you have to work with it often. If you are used to Windows Remote desktop speeds, VNC will just drive you crazy. Fortunately there is a solution. To connect from Ubuntu to Windows we use “rdesktop“, and to connect from Windows to Ubuntu we are going to use “xrdp” which is basically the remote desktop protocol for the xwindows environment.

Instructions
To install “xrdp” click on “Applications” and “Ubuntu Software Center“.
 On the Ubuntu Software Center window, enter “xrdp” in the search field and press the  “enter” key; once it finds it, click on the “install” button.
 When installation finishes on Ubuntu, go to your Windows computer and open the “Remote Desktop Connection“, enter the IP address of the Ubuntu computer and click the “Connect” button.
 Immediately you will see the screen of the remote computer. Enter the username and password for the remote Ubuntu computer and click “OK” to continue.
 And that is all, now you should be able to see and control your remote Ubuntu machine from your Windows computer.


Final Thoughts
Many people in the Linux world do not seem to be aware of the fact that Windows and Ubuntu can communicate using the “real” Windows remote desktop. Not only this is not apparent but, for some reason, Ubuntu decided to rename VNC as “remote desktop viewer”, implying that this is the only way to establish a remote desktop connection.

How to Connect from Windows to Ubuntu using Remote Desktop

I wrote an article that described how to connect from a Ubuntu computer to a Windows Computer using the “real” remote Desktop. Now I will describe how to do the inverse: How to connect from Windows to Ubuntu using Windows remote desktop (the real one as well). As I described in the previous article, Ubuntu’s Remote Desktop is nothing more than VNC, which is very slow and cumbersome compared to the real Microsoft Windows remote desktop.  It can be made to work in a Windows machine if you install VNC, however, that is not the ideal solution specially if you have to work with it often. If you are used to Windows Remote desktop speeds, VNC will just drive you crazy. Fortunately there is a solution. To connect from Ubuntu to Windows we use “rdesktop“, and to connect from Windows to Ubuntu we are going to use “xrdp” which is basically the remote desktop protocol for the xwindows environment.

Instructions
To install “xrdp” click on “Applications” and “Ubuntu Software Center“.
 On the Ubuntu Software Center window, enter “xrdp” in the search field and press the  “enter” key; once it finds it, click on the “install” button.
 When installation finishes on Ubuntu, go to your Windows computer and open the “Remote Desktop Connection“, enter the IP address of the Ubuntu computer and click the “Connect” button.
 Immediately you will see the screen of the remote computer. Enter the username and password for the remote Ubuntu computer and click “OK” to continue.
 And that is all, now you should be able to see and control your remote Ubuntu machine from your Windows computer.


Final Thoughts
Many people in the Linux world do not seem to be aware of the fact that Windows and Ubuntu can communicate using the “real” Windows remote desktop. Not only this is not apparent but, for some reason, Ubuntu decided to rename VNC as “remote desktop viewer”, implying that this is the only way to establish a remote desktop connection.

Posted at 3:37 PM |  by Narut0
To many IT professionals it is imperative to be able to connect remotely to their work via VPN and if you connect by VPN, the next likely step is to connect using Remote Desktop. Many of us however, prefer to use Ubuntu at home and in most workplaces almost all machines are Windows based; that is where the problem comes in. One big obstacle in finding the solution is the apparent lack of a true compatible Windows Remote Desktop alternative in Ubuntu, and the scarcity of information on the web about this topic. This myth becomes even more believable when users find that Ubuntu has labeled VNC as “Remote Desktop Viewer”; a total nonsense. VNC is not compatible with Windows Remote Desktop, but “rdesktop” is and it comes already pre-installed in Ubuntu. I have also written another article that explains how to do the inverse:  Connecting from Windows to Ubuntu using remote desktop .

How to Use Rdesktop
Rdesktop is a command line application. To use it easily and effectively we have to create a custom command line and save it as an executable shortcut on Ubuntu’s desktop.
Right click on the Desktop and click on “Create Document” and “Empty File“.


Right click on your empty test file and rename it whatever you wish.

Then, open your new empty text file and paste the following line inside it:

rdesktop -g 1152x864 -r disk:home=/home/username -r clipboard:CLIPBOARD -r
 sound:off -x l -P 192.168.1.200 -u "administrator@domain.local" -p password


I have highlighted in red the parts of the line that need to be changed.

Command Line Explained by Parts
Changing the Size of the Remote Desktop Screen
To change the size you need to change the resolution; the first part of the line highlighted in red is this resolution, play with it until you get to the desired size. Some of the most common sizes are:
640X480
800X600
1024×768
1152×864

Enter IP of Remote Computer
Change the sample IP “192.168.1.200” to the IP of the remote computer or domain you wish to connect to.
Enter Username of Remote Computer and Domain Name
If you are trying to connect to a Windows Domain, you have to enter your username in that domain and make sure you specify the domain name as part of the username. Take a look at our example. If our username was “Administrator” and our domain name was “domain” then our username will be “administrator@domain.local“. Similarly, if our username was “jdoe” and our domain name was “mycompany” then our username was “jdoe@mycompany.local“. If your computer is not on a domain or it resides inside your same network,  just enter your username.
Enter Password
Just replace the last part of the command line with your password. You can leave this part out if you are concerned about having your network password on a text file that anybody can click. This however, makes it a lot easier, since you will be logged in automatically just by clicking the icon on your desktop, all in one step.
Make Shortcut Executable
To make the shortcut executable, right click on it and select “Properties“, then on the properties windows, click on the “Permissions” tab and check “Allow executing file as a program“.

And finally we will be able to connect to any Windows machine using its native Remote Desktop

How to Use the Real Windows Remote Destop in Ubuntu

To many IT professionals it is imperative to be able to connect remotely to their work via VPN and if you connect by VPN, the next likely step is to connect using Remote Desktop. Many of us however, prefer to use Ubuntu at home and in most workplaces almost all machines are Windows based; that is where the problem comes in. One big obstacle in finding the solution is the apparent lack of a true compatible Windows Remote Desktop alternative in Ubuntu, and the scarcity of information on the web about this topic. This myth becomes even more believable when users find that Ubuntu has labeled VNC as “Remote Desktop Viewer”; a total nonsense. VNC is not compatible with Windows Remote Desktop, but “rdesktop” is and it comes already pre-installed in Ubuntu. I have also written another article that explains how to do the inverse:  Connecting from Windows to Ubuntu using remote desktop .

How to Use Rdesktop
Rdesktop is a command line application. To use it easily and effectively we have to create a custom command line and save it as an executable shortcut on Ubuntu’s desktop.
Right click on the Desktop and click on “Create Document” and “Empty File“.


Right click on your empty test file and rename it whatever you wish.

Then, open your new empty text file and paste the following line inside it:

rdesktop -g 1152x864 -r disk:home=/home/username -r clipboard:CLIPBOARD -r
 sound:off -x l -P 192.168.1.200 -u "administrator@domain.local" -p password


I have highlighted in red the parts of the line that need to be changed.

Command Line Explained by Parts
Changing the Size of the Remote Desktop Screen
To change the size you need to change the resolution; the first part of the line highlighted in red is this resolution, play with it until you get to the desired size. Some of the most common sizes are:
640X480
800X600
1024×768
1152×864

Enter IP of Remote Computer
Change the sample IP “192.168.1.200” to the IP of the remote computer or domain you wish to connect to.
Enter Username of Remote Computer and Domain Name
If you are trying to connect to a Windows Domain, you have to enter your username in that domain and make sure you specify the domain name as part of the username. Take a look at our example. If our username was “Administrator” and our domain name was “domain” then our username will be “administrator@domain.local“. Similarly, if our username was “jdoe” and our domain name was “mycompany” then our username was “jdoe@mycompany.local“. If your computer is not on a domain or it resides inside your same network,  just enter your username.
Enter Password
Just replace the last part of the command line with your password. You can leave this part out if you are concerned about having your network password on a text file that anybody can click. This however, makes it a lot easier, since you will be logged in automatically just by clicking the icon on your desktop, all in one step.
Make Shortcut Executable
To make the shortcut executable, right click on it and select “Properties“, then on the properties windows, click on the “Permissions” tab and check “Allow executing file as a program“.

And finally we will be able to connect to any Windows machine using its native Remote Desktop

Posted at 3:37 PM |  by Narut0
Installing fonts in Ubuntu has certainly become a trivial task. In the past, installing fonts in Ubuntu was cumbersome, requiring you to follow a number of non-intuitive steps that only a true geek could remember. I certainly used to find myself searching on Google every time I would have to install a font in Ubuntu, something definitely not acceptable for an operating system that prides itself on its ease of use. Fortunately, things have greatly improved since those days. Now, a few clicks of a button can open the door to graphic artistry heaven. In this tutorial, I will cover two easy methods you can follow to load new fonts on Ubuntu. These instructions were made in Ubuntu 11.04.

Option #1 – Downloading Fonts from the Web
If you have chosen the font you would like to download and install, do so. However, if you have not, there are many great sites on the web that offer free fonts. My favorites are Dafont and 1001free fonts.
Download the font you wish to install, uncompress the archive, right click on the TTF or OTF file and choose “Open With Font Viewer“.
 Next, on the Font Viewer window, click on “Install Font” and you are done. Your new font should now be part of the list of fonts on any program installed in Ubuntu.

Option #2 – Choosing Fonts from Ubuntu Software Center
Ubuntu has a great selection of fonts you can download and install straight from their “Software Center“. You can even install entire font packs that will give you hundreds of fonts, all with a single click.
Open “Ubuntu Software Center“.

Then, on the right hand side area, click on “Fonts“.
 Choose from any font on the list, click on them and select “Install” . You can choose among single fonts and whole font packs.
Final Thoughts

-->


While the Software Center option is certainly a faster way of loading many fonts on your computer, I tend to prefer downloading the fonts from the web myself since you can quickly scroll though a list of fonts with image samples. With Ubuntu Software Center you have to click on each font to display it; that makes it more time consuming and tedious and, in the case of font packs, you really do not know what you are getting since no display sample is provided; leading you to install hundreds of fonts you do not need.


os of linux
distro do linux
les distributions de linux
desktop with linux
live cd for linux
live cd of linux
thinstation
virtualization linux
inus distros
linus distros
cd multiboot
linux distribution for gaming
linux gaming distros

How to Install Fonts in Ubuntu

Installing fonts in Ubuntu has certainly become a trivial task. In the past, installing fonts in Ubuntu was cumbersome, requiring you to follow a number of non-intuitive steps that only a true geek could remember. I certainly used to find myself searching on Google every time I would have to install a font in Ubuntu, something definitely not acceptable for an operating system that prides itself on its ease of use. Fortunately, things have greatly improved since those days. Now, a few clicks of a button can open the door to graphic artistry heaven. In this tutorial, I will cover two easy methods you can follow to load new fonts on Ubuntu. These instructions were made in Ubuntu 11.04.

Option #1 – Downloading Fonts from the Web
If you have chosen the font you would like to download and install, do so. However, if you have not, there are many great sites on the web that offer free fonts. My favorites are Dafont and 1001free fonts.
Download the font you wish to install, uncompress the archive, right click on the TTF or OTF file and choose “Open With Font Viewer“.
 Next, on the Font Viewer window, click on “Install Font” and you are done. Your new font should now be part of the list of fonts on any program installed in Ubuntu.

Option #2 – Choosing Fonts from Ubuntu Software Center
Ubuntu has a great selection of fonts you can download and install straight from their “Software Center“. You can even install entire font packs that will give you hundreds of fonts, all with a single click.
Open “Ubuntu Software Center“.

Then, on the right hand side area, click on “Fonts“.
 Choose from any font on the list, click on them and select “Install” . You can choose among single fonts and whole font packs.
Final Thoughts

-->


While the Software Center option is certainly a faster way of loading many fonts on your computer, I tend to prefer downloading the fonts from the web myself since you can quickly scroll though a list of fonts with image samples. With Ubuntu Software Center you have to click on each font to display it; that makes it more time consuming and tedious and, in the case of font packs, you really do not know what you are getting since no display sample is provided; leading you to install hundreds of fonts you do not need.


os of linux
distro do linux
les distributions de linux
desktop with linux
live cd for linux
live cd of linux
thinstation
virtualization linux
inus distros
linus distros
cd multiboot
linux distribution for gaming
linux gaming distros

Posted at 3:32 PM |  by Narut0
this is the best penetration testing linux distributions part 1

6. Pentoo
Pentoo  penetration testing linux distributions
Pentoo  penetration testing linux distributions


Pentoo is a security-focused live CD based on Gentoo. In their own words “Pentoo is Gentoo with the pentoo overlay.” So, if you are into Pentoo then this is the distro for you. Their homepage lists some of their customized tools and kernel, including: a Hardened Kernel with aufs patches, Backported Wifi stack from latest stable kernel release, Module loading support ala slax, XFCE4 wm and Cuda/OPENCL cracking support with development tools.

7. Matriux Krypton

Matriux Krypton penetration testing linux distributions
Matriux Krypton penetration testing linux distributions
-->


it have 300 security tools to work, called “arsenals”. The arsenals allow for penetration testing, ethical hacking, system and network administration, security testing, vulnerability analysis, cyber forensics investigations,  exploiting, cracking and data recovery. The last category, data recovery, doesn’t seem to be prevalent in the other distros. pentesting backtrack


this a list of Other penetration testing linux distributions
Katana
VAST
NetSecL
Secmic
Knoppix STD
CAINE

os of linux
distro do linux
les distributions de linux
desktop with linux
live cd for linux
live cd of linux
thinstation
virtualization linux
inus distros
linus distros
cd multiboot
linux distribution for gaming
linux gaming distros


best penetration testing linux distributions : part 2

this is the best penetration testing linux distributions part 1

6. Pentoo
Pentoo  penetration testing linux distributions
Pentoo  penetration testing linux distributions


Pentoo is a security-focused live CD based on Gentoo. In their own words “Pentoo is Gentoo with the pentoo overlay.” So, if you are into Pentoo then this is the distro for you. Their homepage lists some of their customized tools and kernel, including: a Hardened Kernel with aufs patches, Backported Wifi stack from latest stable kernel release, Module loading support ala slax, XFCE4 wm and Cuda/OPENCL cracking support with development tools.

7. Matriux Krypton

Matriux Krypton penetration testing linux distributions
Matriux Krypton penetration testing linux distributions
-->


it have 300 security tools to work, called “arsenals”. The arsenals allow for penetration testing, ethical hacking, system and network administration, security testing, vulnerability analysis, cyber forensics investigations,  exploiting, cracking and data recovery. The last category, data recovery, doesn’t seem to be prevalent in the other distros. pentesting backtrack


this a list of Other penetration testing linux distributions
Katana
VAST
NetSecL
Secmic
Knoppix STD
CAINE

os of linux
distro do linux
les distributions de linux
desktop with linux
live cd for linux
live cd of linux
thinstation
virtualization linux
inus distros
linus distros
cd multiboot
linux distribution for gaming
linux gaming distros


Posted at 3:06 AM |  by Tao

Since beginning 2012 BackTrack had been as used by above a number of trillion beginner and specialist protection experts and professionals. Definitely it's very well-known but you'll find some other Linux pentesting distributions! Like a beneficial plumber wants their tools therefore really does the particular future pentester or curious hacking geek. Not just really does every single facts protection specialist need to utilize a new puncture screening distro but nearly all training demands that you just operate together tools applied within a linux container.


1- BackTrack 5r3

backtrack 5r3 penetration testing linux distributions
The mamma or best known of linux pentesting distros. BackTrack has a very cool strapline: “The quieter you become, the more you are able to hear.” That just sounds cool….
BackTrack is based on the ever-popular Ubuntu. The pentesting distro used to be only available within a KDE environment but Gnome become was added as an option with the release of BackTrack v5. For those working in Information Security or intrusion detection, BackTrack is one of the most popular pentesting distros that can run on a live CD or flash drive. The distribution is ideal for wireless cracking, exploiting, web application assessment, learning, or social-engineering a client.
Listed here is a directory many of the amazing equipment easily obtainable in BackTrack 5r3 (the most current release).
To identify Live Hosts:
dnmap – Distributed NMap
address6 – (which acts as a IPV6 address conversion)
Information Gathering Analysis (Social Engineering)
Jigsaw – Grabs information about company employees
Uberharvest – Email harvester
sslcaudit – SSL Cert audit
VoIP honey – VoIP Honeypot
urlcrazy – Detects URL typos used in typo squatting, url hijacking, phishing
Web Crawlers
Apache_users – Apache username enumerator
Deblaze – Performs enumeration and interrogation against Flash remote end points
Database Analysis
Tnscmd10g – Allows you to inject commands into Oracle
BBQSQL – Blind SQL injection toolkit
* If you are interested in Database Security see our Hacker Halted summary here.

-->
Bluetooth Analysis
Blueranger – Uses link quality to locate Bluetooth devices
Vulnerability Assessment
Lynis – Scans systems & software for security issues
DotDotPwn – Directory Traversal fuzzer
Exploitation Tools
Netgear-telnetable – Enables Telnet console on Netgear devices
Termineter – Smart Meter tester
Htexploit – Tool to bypass standard directory protection
Jboss-Autopwn – Deploys JSP shell on target JBoss servers
Websploit – Scans & analyses remote systems for vulnerabilities
Wireless Exploitation Tools
Bluepot – Bluetooth honeypot
Spooftooph – Spoofs or clones Bluetooth devices
Smartphone-Pentest-Framework
Fern-Wifi-cracker – Gui for testing Wireless encryption strength
Wi-fihoney – Creates fake APs using all encryption and monitors with Airodump
Wifite – Automated wireless auditor
Password Tools
Creddump
Johnny
Manglefizz
Ophcrack
Phrasendresher
Rainbowcrack
Acccheck
smbexec
2. BackBox Linux
backbox penetration testing linux distributions
backbox penetration testing linux distributions


BackBox is getting most liked by the day. Similar to BackTrack , BackBox Linux is an Ubuntu-based submitting designed to complete transmission checks along with safety tests. This builders state that the particular intention having BackBox is usually to make a pentesting distro that is certainly fast and easy to use. BackBox is equipped with quite a concise seeking pc atmosphere along with generally seems to perform perfectly. Like the various other distros BackBox is usually kept up to date for the newest steady versions of the most extremely generally utilised along with best-known honourable hacking equipment by way of repositories.


BackBox features every one of the usual think regarding Forensic Evaluation, Paperwork & Exposure along with Opposite Architectural having equipment similar to ettercap, steve, metasploit, nmap, Cultural Architectural Toolkit, sleuthkit, w3af, wireshark, etc.
3. NodeZero
nodezero penetration testing linux distributions
nodezero penetration testing linux distributions

Like BackTrack, NodeZero is definitely an Ubuntu based distro useful for transmission tests employing repositories thus each time Ubuntu lets out a new patch due to the pesky insects, you also are generally advised with regard to program messages or even renovations. Node Actually zero had been famous due to the add-on regarding THC IPV6 Invasion Toolkit such as instruments similar to alive6, detect-new-ip6, dnsdict6, etc, although I believe why these nights BackTrack 5r3 also incorporates most of these instruments.

Although BackTrack is usually recognized to be a “run-everywhere” distro, i. elizabeth. managing this dwell, NodeZero Linux (which will also be manage live) claim that the particular distros genuine toughness originates from a hard put in. NodeZero, into their unique phrases, feel that a new transmission tester “requires a strong and also useful program [achieved simply by using] a new distribution that's a long lasting setting up, that will advantages of a strong number of instruments, incorporated using a dependable linux setting. Sounds cool. Previously attempted this? Tell us in the comments under.

4.Samurai Web Testing Framework
Samurai Web Testing Framework penetration testing linux distributions
This is a live linux distro that has been pre-configured with some of the best of open source and free tools that focus on testing and attacking websites. (The difference with Samurai Web Testing Framework is that it focuses on attacking (and therefore being able to defend) websites. The developers outline four steps of a web pen-test. These steps are incorporated within the distro and contain the necessary tools to complete the task.

5. Blackbuntu

Blackbuntu penetration testing linux distributions
Blackbuntu penetration testing linux distributions

Yes, as the name clearly suggests, this is yet another distro that is based on Ubuntu. Here is a list of Security and Penetration Testing tools – or rather categories available within the Blackbuntu package, (each category has many sub categories) but this gives you a general idea of what comes with this pentesting distro: Information Gathering, Network Mapping, Vulnerability Identification, Penetration, Privilege Escalation, Maintaining Access, Radio Network Analysis, VoIP Analysis, Digital Forensic, Reverse Engineering and a Miscellanious section. This list is hardly revolutionary but the tools contained within might be different to the other distros.


this is the best penetration testing linux distributions part 2

best penetration testing linux distributions : part 1


Since beginning 2012 BackTrack had been as used by above a number of trillion beginner and specialist protection experts and professionals. Definitely it's very well-known but you'll find some other Linux pentesting distributions! Like a beneficial plumber wants their tools therefore really does the particular future pentester or curious hacking geek. Not just really does every single facts protection specialist need to utilize a new puncture screening distro but nearly all training demands that you just operate together tools applied within a linux container.


1- BackTrack 5r3

backtrack 5r3 penetration testing linux distributions
The mamma or best known of linux pentesting distros. BackTrack has a very cool strapline: “The quieter you become, the more you are able to hear.” That just sounds cool….
BackTrack is based on the ever-popular Ubuntu. The pentesting distro used to be only available within a KDE environment but Gnome become was added as an option with the release of BackTrack v5. For those working in Information Security or intrusion detection, BackTrack is one of the most popular pentesting distros that can run on a live CD or flash drive. The distribution is ideal for wireless cracking, exploiting, web application assessment, learning, or social-engineering a client.
Listed here is a directory many of the amazing equipment easily obtainable in BackTrack 5r3 (the most current release).
To identify Live Hosts:
dnmap – Distributed NMap
address6 – (which acts as a IPV6 address conversion)
Information Gathering Analysis (Social Engineering)
Jigsaw – Grabs information about company employees
Uberharvest – Email harvester
sslcaudit – SSL Cert audit
VoIP honey – VoIP Honeypot
urlcrazy – Detects URL typos used in typo squatting, url hijacking, phishing
Web Crawlers
Apache_users – Apache username enumerator
Deblaze – Performs enumeration and interrogation against Flash remote end points
Database Analysis
Tnscmd10g – Allows you to inject commands into Oracle
BBQSQL – Blind SQL injection toolkit
* If you are interested in Database Security see our Hacker Halted summary here.

-->
Bluetooth Analysis
Blueranger – Uses link quality to locate Bluetooth devices
Vulnerability Assessment
Lynis – Scans systems & software for security issues
DotDotPwn – Directory Traversal fuzzer
Exploitation Tools
Netgear-telnetable – Enables Telnet console on Netgear devices
Termineter – Smart Meter tester
Htexploit – Tool to bypass standard directory protection
Jboss-Autopwn – Deploys JSP shell on target JBoss servers
Websploit – Scans & analyses remote systems for vulnerabilities
Wireless Exploitation Tools
Bluepot – Bluetooth honeypot
Spooftooph – Spoofs or clones Bluetooth devices
Smartphone-Pentest-Framework
Fern-Wifi-cracker – Gui for testing Wireless encryption strength
Wi-fihoney – Creates fake APs using all encryption and monitors with Airodump
Wifite – Automated wireless auditor
Password Tools
Creddump
Johnny
Manglefizz
Ophcrack
Phrasendresher
Rainbowcrack
Acccheck
smbexec
2. BackBox Linux
backbox penetration testing linux distributions
backbox penetration testing linux distributions


BackBox is getting most liked by the day. Similar to BackTrack , BackBox Linux is an Ubuntu-based submitting designed to complete transmission checks along with safety tests. This builders state that the particular intention having BackBox is usually to make a pentesting distro that is certainly fast and easy to use. BackBox is equipped with quite a concise seeking pc atmosphere along with generally seems to perform perfectly. Like the various other distros BackBox is usually kept up to date for the newest steady versions of the most extremely generally utilised along with best-known honourable hacking equipment by way of repositories.


BackBox features every one of the usual think regarding Forensic Evaluation, Paperwork & Exposure along with Opposite Architectural having equipment similar to ettercap, steve, metasploit, nmap, Cultural Architectural Toolkit, sleuthkit, w3af, wireshark, etc.
3. NodeZero
nodezero penetration testing linux distributions
nodezero penetration testing linux distributions

Like BackTrack, NodeZero is definitely an Ubuntu based distro useful for transmission tests employing repositories thus each time Ubuntu lets out a new patch due to the pesky insects, you also are generally advised with regard to program messages or even renovations. Node Actually zero had been famous due to the add-on regarding THC IPV6 Invasion Toolkit such as instruments similar to alive6, detect-new-ip6, dnsdict6, etc, although I believe why these nights BackTrack 5r3 also incorporates most of these instruments.

Although BackTrack is usually recognized to be a “run-everywhere” distro, i. elizabeth. managing this dwell, NodeZero Linux (which will also be manage live) claim that the particular distros genuine toughness originates from a hard put in. NodeZero, into their unique phrases, feel that a new transmission tester “requires a strong and also useful program [achieved simply by using] a new distribution that's a long lasting setting up, that will advantages of a strong number of instruments, incorporated using a dependable linux setting. Sounds cool. Previously attempted this? Tell us in the comments under.

4.Samurai Web Testing Framework
Samurai Web Testing Framework penetration testing linux distributions
This is a live linux distro that has been pre-configured with some of the best of open source and free tools that focus on testing and attacking websites. (The difference with Samurai Web Testing Framework is that it focuses on attacking (and therefore being able to defend) websites. The developers outline four steps of a web pen-test. These steps are incorporated within the distro and contain the necessary tools to complete the task.

5. Blackbuntu

Blackbuntu penetration testing linux distributions
Blackbuntu penetration testing linux distributions

Yes, as the name clearly suggests, this is yet another distro that is based on Ubuntu. Here is a list of Security and Penetration Testing tools – or rather categories available within the Blackbuntu package, (each category has many sub categories) but this gives you a general idea of what comes with this pentesting distro: Information Gathering, Network Mapping, Vulnerability Identification, Penetration, Privilege Escalation, Maintaining Access, Radio Network Analysis, VoIP Analysis, Digital Forensic, Reverse Engineering and a Miscellanious section. This list is hardly revolutionary but the tools contained within might be different to the other distros.


this is the best penetration testing linux distributions part 2

Posted at 5:53 AM |  by Tao

BackTrack is a Ubuntu-based distribution developed mostly with regard to safety measures tests and it is offered for all those end user quantities via newbies in order to state-of-the-art. The BackTrack distro offers skilled end users along with online hackers a huge number of wide open supplier resources along with ammenities in which assistance in tests ones computer hardware along with system (wireless/wired) with regard to safety measures vulnerabilities. Their property webpage could be seen below if you would like have more info on that Linux distro.


In this guide many of us will help you create your BackTrack library in order to Ubuntu to enable you to put in BackTrack programs natively using "sudo apt-get put in package" or even via Ubuntu Application Middle.

How to get started

Open your fatal underneath Ubuntu 12. 10/12. 04/11. 10 or even older along with operate this codes to add your BackTrack library:

wget -q http: //all. library. backtrack-linux. org/backtrack. gpg -O- | sudo apt-key create --
-->
sudo sh -c "echo 'deb http: //all. library. backtrack-linux. org revolution main microverse non-free testing' >> /etc/apt/sources. list"

sudo apt-get update

sudo apt-get improve

To evaluate in the event the library can be added in effectively, you can attempt to run that BackTrack package deal:

sudo apt-get put in backtrack-wallpapers

Or even searching BackTrack software via Ubuntu Application Center

keywords :

instalasi backtrack 5

backtrack 5 en ubuntu
backtrack usb installation
backtrack 5 r3 en español
bootbarer usb stick
linux distri
install ubuntu by usb
back track r3
linux penetration testing distributions
penetration testing distribution linux

The best way to add The BackTrack Repository to Ubuntu


BackTrack is a Ubuntu-based distribution developed mostly with regard to safety measures tests and it is offered for all those end user quantities via newbies in order to state-of-the-art. The BackTrack distro offers skilled end users along with online hackers a huge number of wide open supplier resources along with ammenities in which assistance in tests ones computer hardware along with system (wireless/wired) with regard to safety measures vulnerabilities. Their property webpage could be seen below if you would like have more info on that Linux distro.


In this guide many of us will help you create your BackTrack library in order to Ubuntu to enable you to put in BackTrack programs natively using "sudo apt-get put in package" or even via Ubuntu Application Middle.

How to get started

Open your fatal underneath Ubuntu 12. 10/12. 04/11. 10 or even older along with operate this codes to add your BackTrack library:

wget -q http: //all. library. backtrack-linux. org/backtrack. gpg -O- | sudo apt-key create --
-->
sudo sh -c "echo 'deb http: //all. library. backtrack-linux. org revolution main microverse non-free testing' >> /etc/apt/sources. list"

sudo apt-get update

sudo apt-get improve

To evaluate in the event the library can be added in effectively, you can attempt to run that BackTrack package deal:

sudo apt-get put in backtrack-wallpapers

Or even searching BackTrack software via Ubuntu Application Center

keywords :

instalasi backtrack 5

backtrack 5 en ubuntu
backtrack usb installation
backtrack 5 r3 en español
bootbarer usb stick
linux distri
install ubuntu by usb
back track r3
linux penetration testing distributions
penetration testing distribution linux

Posted at 6:00 AM |  by Tao
Recently My spouse and i been successful inside installing all of those distros : Big father Ubuntu as well as progenies Kubuntu, Xubuntu and also Lubuntu. Used to do some sort of stay shoe coming from all some on my own Asus K54C laptop together with 3. 3 GHz Intel second Gen Ci3 processor and also 3 GB DDR3 MEMORY and also later installed on the same, a single right after one more to look at your shows, programs as well as other attributes regarding almost all these systems.

I delivered electronically thirty-two bit ISO regarding each one of these distros in the respected websites. Each is compatible to be able to Unetbootin thus, organizing stay hardware weren't a problem. With regard to installing I chosen the full installing setting using world-wide-web upon and also within process installing updates along with multimedia system codecs. For this reason, every single installing got in relation to around 30 minutes to begin for your examine and also contrast.

Comparison

-->

ParametersUbuntu 12.10Kubuntu 12.10Xubuntu 12.10Lubuntu 12.10
Size of ISO790 MB999.6 MB727 MB726 MB
Booting time (post installation)9 sec10 sec8 sec8 sec
DesktopUnity with Gnome 3.6KDE 4.9.2XFCE 4.10LXDE
Linux kernel3.5.0-173.5.0-173.5.0-173.5.0-17
CPU usage (live boot)20-30%2-6%1-5%1-5%
RAM usage (live boot)456 MB270 MB180 MB134 MB
CPU Usage (post installation)20-30%2-10%1-5%0-5%
RAM usage (post installation)412 MB300 MB160 MB123 MB
Installation time (with 1 MBPS connection)30 min.30 min.30 min.30 min.
Wifi detectionImmediateImmediateImmediateImmediate
Touchpad detectionWorks by defaultWorks by defaultWorks by defaultWorks by default
Ease of useA bit on the slower sideWorks well on the systemReally smooth to useReally smooth to use
Eye candy factorLooks awesome!Plasma interface looks goodInterface is brighter and looks better than everInterface looks more or less the same, a bit bland
RepositoryUbuntu Software Center 5.4.1.2Muon Package Manager 1.4.1Ubuntu Software Center 5.4.1.2Lubuntu Software Center
File ManagerNautilus 3.4.2Dolphin 2.1Thunar 1.4PCManFM 1.0.1
StabilityHanged while playing video in Gnome MPlayerCPU utilization 100% while playing video in Dragon Player; but didn't hang20% CPU utilization while playing video in VLC14% CPU usage while playing video in Gnome MPlayer


os of linux
distro do linux
les distributions de linux
desktop with linux
live cd for linux
live cd of linux
thinstation
virtualization linux
inus distros
linus distros
cd multiboot
linux distribution for gaming
linux gaming distros

Ubuntu vs Kubuntu 12.10 Vs Xubuntu 12.10 Vs Lubuntu 12.10

Recently My spouse and i been successful inside installing all of those distros : Big father Ubuntu as well as progenies Kubuntu, Xubuntu and also Lubuntu. Used to do some sort of stay shoe coming from all some on my own Asus K54C laptop together with 3. 3 GHz Intel second Gen Ci3 processor and also 3 GB DDR3 MEMORY and also later installed on the same, a single right after one more to look at your shows, programs as well as other attributes regarding almost all these systems.

I delivered electronically thirty-two bit ISO regarding each one of these distros in the respected websites. Each is compatible to be able to Unetbootin thus, organizing stay hardware weren't a problem. With regard to installing I chosen the full installing setting using world-wide-web upon and also within process installing updates along with multimedia system codecs. For this reason, every single installing got in relation to around 30 minutes to begin for your examine and also contrast.

Comparison

-->

ParametersUbuntu 12.10Kubuntu 12.10Xubuntu 12.10Lubuntu 12.10
Size of ISO790 MB999.6 MB727 MB726 MB
Booting time (post installation)9 sec10 sec8 sec8 sec
DesktopUnity with Gnome 3.6KDE 4.9.2XFCE 4.10LXDE
Linux kernel3.5.0-173.5.0-173.5.0-173.5.0-17
CPU usage (live boot)20-30%2-6%1-5%1-5%
RAM usage (live boot)456 MB270 MB180 MB134 MB
CPU Usage (post installation)20-30%2-10%1-5%0-5%
RAM usage (post installation)412 MB300 MB160 MB123 MB
Installation time (with 1 MBPS connection)30 min.30 min.30 min.30 min.
Wifi detectionImmediateImmediateImmediateImmediate
Touchpad detectionWorks by defaultWorks by defaultWorks by defaultWorks by default
Ease of useA bit on the slower sideWorks well on the systemReally smooth to useReally smooth to use
Eye candy factorLooks awesome!Plasma interface looks goodInterface is brighter and looks better than everInterface looks more or less the same, a bit bland
RepositoryUbuntu Software Center 5.4.1.2Muon Package Manager 1.4.1Ubuntu Software Center 5.4.1.2Lubuntu Software Center
File ManagerNautilus 3.4.2Dolphin 2.1Thunar 1.4PCManFM 1.0.1
StabilityHanged while playing video in Gnome MPlayerCPU utilization 100% while playing video in Dragon Player; but didn't hang20% CPU utilization while playing video in VLC14% CPU usage while playing video in Gnome MPlayer


os of linux
distro do linux
les distributions de linux
desktop with linux
live cd for linux
live cd of linux
thinstation
virtualization linux
inus distros
linus distros
cd multiboot
linux distribution for gaming
linux gaming distros

Posted at 4:00 AM |  by taoufiq
-->
How to update backtrack  to 5 R3 /how to update  backtrack tools
First :  make sure that your existing system ( backtrack 5 R2 ) is fully updated: 
apt-get update && apt-get dist-upgrade
With the dist-upgrade finished
 all that remains is the install the new tools that have been added for R3. 
An important point to keep in mind is that there are slight differences between the 32-bit and 64-bit tools so make sure you choose the right one.

32-bit backtrack tools :
apt-get install libcrafter blueranger dbd inundator intersect mercury cutycapt trixd00r artemisa rifiuti2 netgear-telnetenable jboss-autopwn deblaze sakis3g voiphoney apache-users phrasendrescher kautilya manglefizz rainbowcrack rainbowcrack-mt lynis-audit spooftooph wifihoney twofi truecrack uberharvest acccheck statsprocessor iphoneanalyzer jad javasnoop mitmproxy ewizard multimac netsniff-ng smbexec websploit dnmap johnny unix-privesc-check sslcaudit dhcpig intercepter-ng u3-pwn binwalk laudanum wifite tnscmd10g bluepot dotdotpwn subterfuge jigsaw urlcrazy creddump android-sdk apktool ded dex2jar droidbox smali termineter bbqsql htexploit smartphone-pentest-framework fern-wifi-cracker powersploit webhandler
64-bit backtrack tools  :


apt-get install libcrafter blueranger dbd inundator intersect mercury cutycapt trixd00r rifiuti2 netgear-telnetenable jboss-autopwn deblaze sakis3g voiphoney apache-users phrasendrescher kautilya manglefizz rainbowcrack rainbowcrack-mt lynis-audit spooftooph wifihoney twofi truecrack acccheck statsprocessor iphoneanalyzer jad javasnoop mitmproxy ewizard multimac netsniff-ng smbexec websploit dnmap johnny unix-privesc-check sslcaudit dhcpig intercepter-ng u3-pwn binwalk laudanum wifite tnscmd10g bluepot dotdotpwn subterfuge jigsaw urlcrazy creddump android-sdk apktool ded dex2jar droidbox smali termineter multiforcer bbqsql htexploit smartphone-pentest-framework fern-wifi-cracker powersploit webhandler
That’s all there is to it . 
your backtrack update is done  all backtrack tools are update

keywords:
penetration testing using backtrack 5
ubuntu backtrack
backtrack 5 en ubuntu
backtrack usb installation
backtrack 5 r3 en español
bootbarer usb stick
linux distri
install ubuntu by usb
back track r3
linux penetration testing distributions
penetration testing distribution linux
backtrack ubuntu
backtrack sur ubuntu

[backtrack update] backtrack 5 R2 to backtrack 5 R3

-->
How to update backtrack  to 5 R3 /how to update  backtrack tools
First :  make sure that your existing system ( backtrack 5 R2 ) is fully updated: 
apt-get update && apt-get dist-upgrade
With the dist-upgrade finished
 all that remains is the install the new tools that have been added for R3. 
An important point to keep in mind is that there are slight differences between the 32-bit and 64-bit tools so make sure you choose the right one.

32-bit backtrack tools :
apt-get install libcrafter blueranger dbd inundator intersect mercury cutycapt trixd00r artemisa rifiuti2 netgear-telnetenable jboss-autopwn deblaze sakis3g voiphoney apache-users phrasendrescher kautilya manglefizz rainbowcrack rainbowcrack-mt lynis-audit spooftooph wifihoney twofi truecrack uberharvest acccheck statsprocessor iphoneanalyzer jad javasnoop mitmproxy ewizard multimac netsniff-ng smbexec websploit dnmap johnny unix-privesc-check sslcaudit dhcpig intercepter-ng u3-pwn binwalk laudanum wifite tnscmd10g bluepot dotdotpwn subterfuge jigsaw urlcrazy creddump android-sdk apktool ded dex2jar droidbox smali termineter bbqsql htexploit smartphone-pentest-framework fern-wifi-cracker powersploit webhandler
64-bit backtrack tools  :


apt-get install libcrafter blueranger dbd inundator intersect mercury cutycapt trixd00r rifiuti2 netgear-telnetenable jboss-autopwn deblaze sakis3g voiphoney apache-users phrasendrescher kautilya manglefizz rainbowcrack rainbowcrack-mt lynis-audit spooftooph wifihoney twofi truecrack acccheck statsprocessor iphoneanalyzer jad javasnoop mitmproxy ewizard multimac netsniff-ng smbexec websploit dnmap johnny unix-privesc-check sslcaudit dhcpig intercepter-ng u3-pwn binwalk laudanum wifite tnscmd10g bluepot dotdotpwn subterfuge jigsaw urlcrazy creddump android-sdk apktool ded dex2jar droidbox smali termineter multiforcer bbqsql htexploit smartphone-pentest-framework fern-wifi-cracker powersploit webhandler
That’s all there is to it . 
your backtrack update is done  all backtrack tools are update

keywords:
penetration testing using backtrack 5
ubuntu backtrack
backtrack 5 en ubuntu
backtrack usb installation
backtrack 5 r3 en español
bootbarer usb stick
linux distri
install ubuntu by usb
back track r3
linux penetration testing distributions
penetration testing distribution linux
backtrack ubuntu
backtrack sur ubuntu

Posted at 11:10 AM |  by taoufiq
Ubuntu and other Linux distributions have proven to be really useful when Windows stops working. Versatility, portability and speed are among the many advantages of having a bootable OS in a USB flash drive. These installations can help fix problems in Windows operating systems, such as viruses, errors in the registry, etc. They can also act as an “emergency operating system”  when Windows fails, providing an alternate OS you can boot from to extract your files from the affected computer.  Booting from USB flash drives does have one drawback: older computers won’t have this capability. Fortunately, it is becoming less common to find computers that do not support booting from USB. In this tutorial I show you how to create a bootable Ubuntu USB flash drive from Windows. To accomplish this, we are going to be using a utility called Unetbootin.
Instructions
Download the latest Ubuntu distribution (Unetbootin even supports the daily Ubuntu builds)
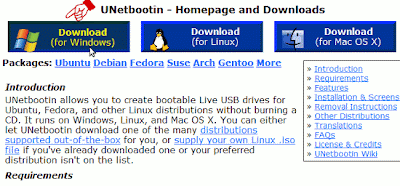
Download Unetbootin; the program does not have an installation as it does not need one; just double click on it and it will start.


On top of the Unetbootin windows you will see two drop down menus; ignore them if you have already downloaded the ISO. If you do not have the ISO, just select the distribution and the version and Unetbootin will download, and install it for you. The reason I did not focus on this part for the tutorial, is because many of you probably have the ISO downloaded already.
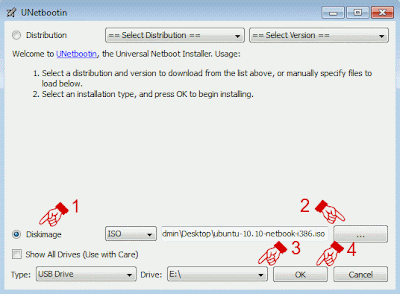
1) Select “Diskimage“.
2) Click the “browse” button and select your ISO image.
3) Make sure your USB destination drive is set to the correct drive letter.
4) Click “OK” to start the process.
 Next, Unetbootin will start creating your flash drive. The Ubuntu image is about 700mb, so the process can take a while.
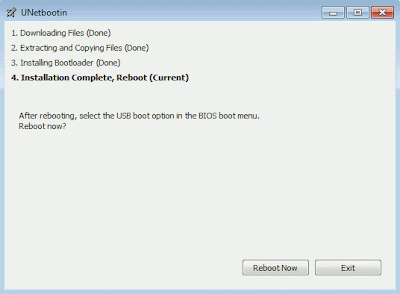
 When Unetbootin finishes creating your Ubuntu bootable USB flash drive, it will give you the choice to either “Reboot” or “Exit” the program. Choose reboot if you wish to try your newly created Ubuntu USB flash drive, otherwise choose “Exit”.

Creating a Bootable Ubuntu USB Flash Drive From Windows

Ubuntu and other Linux distributions have proven to be really useful when Windows stops working. Versatility, portability and speed are among the many advantages of having a bootable OS in a USB flash drive. These installations can help fix problems in Windows operating systems, such as viruses, errors in the registry, etc. They can also act as an “emergency operating system”  when Windows fails, providing an alternate OS you can boot from to extract your files from the affected computer.  Booting from USB flash drives does have one drawback: older computers won’t have this capability. Fortunately, it is becoming less common to find computers that do not support booting from USB. In this tutorial I show you how to create a bootable Ubuntu USB flash drive from Windows. To accomplish this, we are going to be using a utility called Unetbootin.
Instructions
Download the latest Ubuntu distribution (Unetbootin even supports the daily Ubuntu builds)
Download Unetbootin; the program does not have an installation as it does not need one; just double click on it and it will start.


On top of the Unetbootin windows you will see two drop down menus; ignore them if you have already downloaded the ISO. If you do not have the ISO, just select the distribution and the version and Unetbootin will download, and install it for you. The reason I did not focus on this part for the tutorial, is because many of you probably have the ISO downloaded already.
1) Select “Diskimage“.
2) Click the “browse” button and select your ISO image.
3) Make sure your USB destination drive is set to the correct drive letter.
4) Click “OK” to start the process.
 Next, Unetbootin will start creating your flash drive. The Ubuntu image is about 700mb, so the process can take a while.
 When Unetbootin finishes creating your Ubuntu bootable USB flash drive, it will give you the choice to either “Reboot” or “Exit” the program. Choose reboot if you wish to try your newly created Ubuntu USB flash drive, otherwise choose “Exit”.

Posted at 2:34 AM |  by Narut0
-->
You might be looking for a way to try out Ubuntu Linux but don’t like the idea of creating a partition, using a slow live CD, or don’t have enough resources to run a virtual machine. Today we take a look at using the Wubi installer to get Ubuntu running on your computer with very little effort.
Wubi is an officially supported Ubuntu installer that allows Windows users to easily get started in the Linux realm. Using Wubi to install Ubuntu is a similar process you’d use to install any other software program in Windows. It saves you the hassle of creating another partition or creating a VM. Wubi has been around for a few years now, and official version have been included on the Ubuntu Live CD since 8.04 “Hardy Heron”. We’ll take a look at installing Wubi from the Ubuntu Live CD and also downloading Wubi.exe separately and installing Ubuntu.  
Installing Ubuntu with Wubi from Ubuntu CD
In this first method we’ve already downloaded the Ubuntu Live ISO and burned it to CD. In Windows pop in the Ubuntu 9.10 installation disc and run wubi.exe.

Download Wubi Installer
Download Ubuntu 9.10


At the Ubuntu Menu screen click the Install inside Windows button.
At the Ubuntu Installer screen you choose the language, install drive, installation size, username and password then when you’re finished click Install.

Give it a few moments while the installation kicks off…


When it’s complete, a restart is required but you can do it right away or wait until later.

Installing Ubuntu from Wubi.exe
If you don’t already have the Ubuntu CD, another option is to download the Wubi Installer and kick off the install process. This simplifies the process even more because you don’t need to download the ISO and burn it to disc. One thing to point out with this method is you’ll get extra choices for the type of Desktop Environment you wish to install. In this example we’re choosing the Kubuntu environment.

Now when the installation takes place, it will download the appropriate ISO for the chosen desktop environment. Kubuntu uses the KDE environment which is different from the Gnome used in Ubuntu. The main difference is that KDE is more flashy with graphics and might be easier for a Windows user to get comfortable with.

No matter which route you take to install Ubuntu with Wubi, everything is installed to C:\Ubuntu directory.

Booting Into Ubuntu
After the first reboot, you can choose between Windows 7 or Ubuntu at the Windows Boot Manager screen.
 The first time you boot into Ubuntu, wait a few minutes while the installation finishes up. You’ll see a series of screens and then the main install screen is displayed showing progress and screens showing features offered in Ubuntu 10.12
 Your system will reboot one more time and again you will have Windows 7 or Ubuntu to choose from.
 When you select Ubuntu from the bootloader, it will go into the GRUB bootloader where you can select Ubuntu, Recovery Mode, or back to the Windows 7 Boot Manager.
 At the Ubuntu login screen you’ll notice the username and password will be what you gave it in the steps above.
 That’s really all there is to it…now you can easily boot into Ubuntu and get your geek on with this popular flavor of Linux.

Here is a look at the Kubuntu interface after a bit of tweaking…if you choose that route.

 After Ubuntu has been completely installed, you can select the default boot system by going into Advance System Settings \ Startup and Recovery…then selecting between Windows or Ubuntu.

Uninstall Ubuntu
So you’ve tried Ubuntu and decided you don’t like it, so now what do you do? It’s easy…just uninstall it. Boot into Windows 7 and go into Add / Remove Programs…

Or use a utility like Revo Uninstaller.
 The uninstall process is extremely simple as well and consists of two screens. Verify you want to uninstall Ubuntu…
 That’s it! It’s uninstalled and you have your hard drive space back. When you reboot your system, there’s no leftover funky GRUB or other bootloader to worry about. Your PC will boot directly into Windows.

Conclusion
This might be the easiest way for the Linux beginner to get their feet wet with Ubuntu as there are no partitions to create and installation is extremely simple. For this article we used Windows 7 but it should work on Windows 98 through Windows 7 …except for Windows ME…which no one should be running anyway. If you’re looking for an extremely easy way to start using Ubuntu Linux, you’ll definitely want to give the Wubi install a try.

Download Wubi Installer
Download Ubuntu 9.10

in this articles we see :
installing ubuntu on a windows machine
how do i install wubi
how do i start wubi

installing ubuntu on a windows machine

-->
You might be looking for a way to try out Ubuntu Linux but don’t like the idea of creating a partition, using a slow live CD, or don’t have enough resources to run a virtual machine. Today we take a look at using the Wubi installer to get Ubuntu running on your computer with very little effort.
Wubi is an officially supported Ubuntu installer that allows Windows users to easily get started in the Linux realm. Using Wubi to install Ubuntu is a similar process you’d use to install any other software program in Windows. It saves you the hassle of creating another partition or creating a VM. Wubi has been around for a few years now, and official version have been included on the Ubuntu Live CD since 8.04 “Hardy Heron”. We’ll take a look at installing Wubi from the Ubuntu Live CD and also downloading Wubi.exe separately and installing Ubuntu.  
Installing Ubuntu with Wubi from Ubuntu CD
In this first method we’ve already downloaded the Ubuntu Live ISO and burned it to CD. In Windows pop in the Ubuntu 9.10 installation disc and run wubi.exe.

Download Wubi Installer
Download Ubuntu 9.10


At the Ubuntu Menu screen click the Install inside Windows button.
At the Ubuntu Installer screen you choose the language, install drive, installation size, username and password then when you’re finished click Install.

Give it a few moments while the installation kicks off…


When it’s complete, a restart is required but you can do it right away or wait until later.

Installing Ubuntu from Wubi.exe
If you don’t already have the Ubuntu CD, another option is to download the Wubi Installer and kick off the install process. This simplifies the process even more because you don’t need to download the ISO and burn it to disc. One thing to point out with this method is you’ll get extra choices for the type of Desktop Environment you wish to install. In this example we’re choosing the Kubuntu environment.

Now when the installation takes place, it will download the appropriate ISO for the chosen desktop environment. Kubuntu uses the KDE environment which is different from the Gnome used in Ubuntu. The main difference is that KDE is more flashy with graphics and might be easier for a Windows user to get comfortable with.

No matter which route you take to install Ubuntu with Wubi, everything is installed to C:\Ubuntu directory.

Booting Into Ubuntu
After the first reboot, you can choose between Windows 7 or Ubuntu at the Windows Boot Manager screen.
 The first time you boot into Ubuntu, wait a few minutes while the installation finishes up. You’ll see a series of screens and then the main install screen is displayed showing progress and screens showing features offered in Ubuntu 10.12
 Your system will reboot one more time and again you will have Windows 7 or Ubuntu to choose from.
 When you select Ubuntu from the bootloader, it will go into the GRUB bootloader where you can select Ubuntu, Recovery Mode, or back to the Windows 7 Boot Manager.
 At the Ubuntu login screen you’ll notice the username and password will be what you gave it in the steps above.
 That’s really all there is to it…now you can easily boot into Ubuntu and get your geek on with this popular flavor of Linux.

Here is a look at the Kubuntu interface after a bit of tweaking…if you choose that route.

 After Ubuntu has been completely installed, you can select the default boot system by going into Advance System Settings \ Startup and Recovery…then selecting between Windows or Ubuntu.

Uninstall Ubuntu
So you’ve tried Ubuntu and decided you don’t like it, so now what do you do? It’s easy…just uninstall it. Boot into Windows 7 and go into Add / Remove Programs…

Or use a utility like Revo Uninstaller.
 The uninstall process is extremely simple as well and consists of two screens. Verify you want to uninstall Ubuntu…
 That’s it! It’s uninstalled and you have your hard drive space back. When you reboot your system, there’s no leftover funky GRUB or other bootloader to worry about. Your PC will boot directly into Windows.

Conclusion
This might be the easiest way for the Linux beginner to get their feet wet with Ubuntu as there are no partitions to create and installation is extremely simple. For this article we used Windows 7 but it should work on Windows 98 through Windows 7 …except for Windows ME…which no one should be running anyway. If you’re looking for an extremely easy way to start using Ubuntu Linux, you’ll definitely want to give the Wubi install a try.

Download Wubi Installer
Download Ubuntu 9.10

in this articles we see :
installing ubuntu on a windows machine
how do i install wubi
how do i start wubi

Posted at 1:22 PM |  by Narut0
© 2013 FreshGeek. WP Theme-junkie converted by BloggerTheme9
Blogger templates. Proudly Powered by Blogger.
back to top